PEX plumbing can speed up any project.
It’s fast, easy, and doesn’t require many tools.
However, like any plumbing, you can make costly mistakes that cause water leaks.
In this tutorial, you’ll get a materials list, see what tools I use, and learn how to avoid the dreaded water leak.
I show how to install a Delta shower valve from start to finish, and all the tips apply to any PEX A plumbing project.
Let’s dive in!
PEX A Plumbing Guide
I’ve organized this tutorial into the following sections:
- PEX Thru-Stud Isolators
- How to Add Shower Valve Wood Blocking
- How to Use SharkBite PEX A
- How to Prepare a Delta Diverter Valve for PEX A
- How to Install Drop Ear Elbows for PEX A
You can tap the above links, and they’ll take you to that section.
Many thanks to SharkBite for sponsoring this tutorial.
SharkBite makes push-to-connect fittings (which are great for copper pipe leaks), but they also have a wide selection of traditional PEX A products, e.g., sleeves, brass fittings, cutters, etc.
PEX Thru-Stud Isolators
Have you ever turned on the shower and heard creaking inside the wall?
Those are the water supply lines expanding against the studs. Over time, that rubbing can wear away the pipe and cause a water leak.
Thru-stud isolators are the solution.
I drilled larger holes in the bottom plate using a 1-1/4 inch hole saw.
It’s best to center this hole on the stud.

Then I pushed the PEX A through those holes and clamped the stud isolator to it.
I lightly tap the stud isolator with a hammer and use 1-inch galvanized screws to fasten it to the bottom plate.
Now the PEX A won’t rub against the framing, and my client shouldn’t hear any noises inside their shower wall.
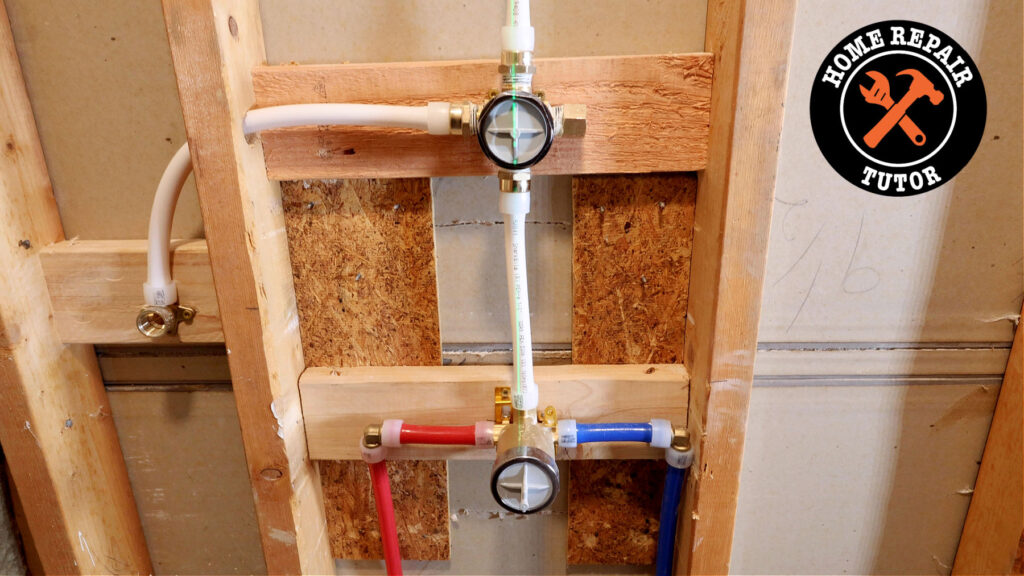
How to Add Shower Valve Wood Blocking
I frequently use wood blocking to support shower valves, water supply lines, and shower drain pipes.

The most important aspects are to ensure the blocking is set to the correct depth, plumb, and properly fastened.
For example, in this shower, I’m using a Delta shower valve.
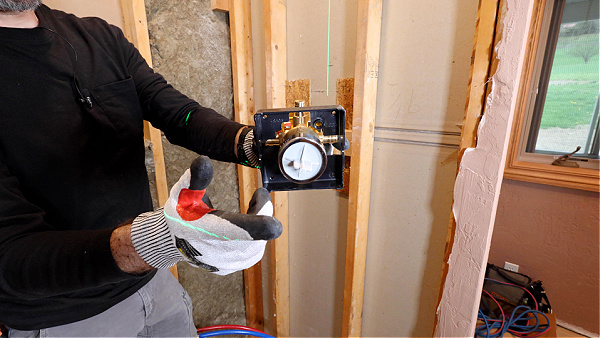
Delta has specific recommendations for the valve depth.
Typically, I place a 2×4 or 2×6 flush with the drywall on the back of the wall. This is for standard 2×4 stud walls.
But in this shower, there was a drywall repair, and the person used 1/2-inch OSB to repair.
As such, we had to cut a 2×4 to a different depth, approximately 1 inch.

I then fastened this blocking to the studs using 3-1/8 inch GRK Multipurpose screws on all four corners.

This blocking sets the valve depth so that the shower wall backer board (1/2 inch thick) and tile (1/4 inch thick) are flush with the front of the black plaster guard.
The depth is also important for how I waterproof around the valve.
Note: Once I set the shower valve, I remove the black plaster guard and don’t leave it inside the wall. It’s not necessary after this point.
Don’t forget, shower valve height is also important and depends on the users.
How to Use SharkBite PEX A
SharkBite makes push-to-connect fittings as well as PEX A and PEX B supplies.

Here’s a list of the PEX A materials I used:
- PEX A Tubing
- PEX A 90-Degree Fittings
- PEX A Sleeves
- PEX A Female Adapters (1/2 inch x 1/2 inch NPT)
- PEX A Drop Ear Elbox (1/2 inch x 1/2 inch)
- SharkBite PEX Tubing Cutters
- Milwaukee M18 Expansion Tool
- Oatey Megatape
- Blue Monster Pipe Thread Sealant
- Channellock 12-inch Pliers
The most expensive item is the M18 expansion tool.

That said, it might be worth renting if you only need it for a day.
I love PEX A because it’s faster and more flexible than PEX B.
Plus, the internal diameter of the fittings is bigger than that of PEX B. Some folks argue that this increases water flow.
By the way, I use PEX A for tub shower valves, too.
It’s essential to cut PEX A square. And I use these SharkBite cutters to do that; they work exceptionally well.

This ensures it will seat properly on the valve (in this case), as well as the fittings and sleeve.
I use the SharkBite PEX A sleeves that have stops. These get pushed onto the tubing until they stop.

Then I expand the 1/2-inch PEX A & sleeve five to six times and immediately push it up to the shoulder of the fitting.

I hold the PEX A for 15 to 30 seconds until it makes a tight seal.
And that’s pretty much the entire installation in a nutshell.
I love PEX A for tight spots between joists or studs. I can easily reach into a joist bay, expand the PEX A, and make connections.
That’s not as easy when working with PEX B or soldering copper.
How to Prepare a Delta Diverter Valve for PEX A
I purposely asked my client to get a Delta shower valve that already had PEX A fittings installed at the factory.

This speeds up shower valve installations.
Unfortunately, Delta doesn’t make a diverter valve with the PEX A fittings.
No problem.
I use PEX A threaded adapters, i.e 1/2 inch by 1/2 inch female adapters.
The first step is to apply 3 to 4 revolutions of Megatape to the valve threads.

I do this in the direction in which the cap or adapter will be installed.
Then I apply pipe thread sealant (Blue Monster) to the Megatape.

I ensure the thread sealant fills the valleys of the tape.
Then I add my cap or adapters – first by hand and then with the wrench or pliers.

Side note: If you’re installing a Delta diverter valve, it’s important to cap the right-hand port for a three-function setup.
For instance, the three functions for this shower are the shower head, handheld, and handheld/shower head.
Keep this in mind when installing a similar valve.
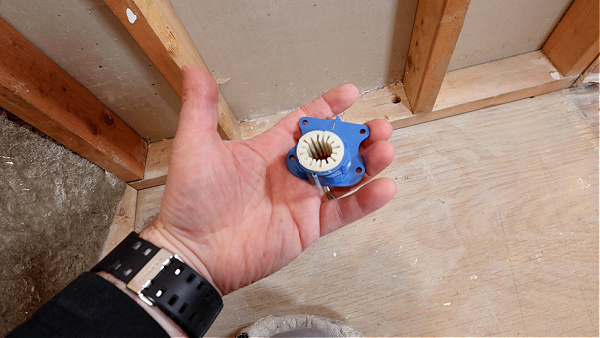
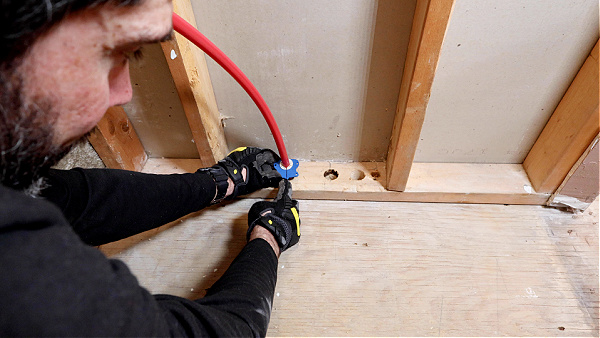
How to Install Drop Ear Elbows for PEX A
Drop ear elbows are common in bathrooms.
They are used for shower heads, shower wand plumbing, and some water supply lines.

On this project, I had to install two drop ears.
The first one was for the handheld shower wand.
By the way, I highly recommend shower wands for cleaning yourself, loved ones, pets, and the shower itself.
They are fantastic.
I connected the PEX A to the left-hand port of the diverter valve.

Then I used the same PEX A installation techniques for the drop ear.
Notice how I didn’t need a 90-degree fitting; that’s because the PEX A can bend.

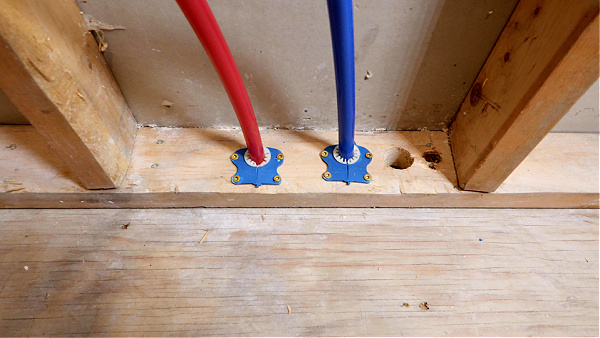
Most drop ears will have three screw holes.
I use all three and fasten the drop ear to wood blocking with 1-inch galvanized scerws.
This is important because the installation of the shower trim exerts a lot of torque on the drop ear.

As a result, it’s critical to properly secure the drop ear to the blocking.
I recommend the same thing for the shower head drop ear.

Primarily because the shower arm installation for the shower head will require some medium torque.
And that last thing you want is to break the drop ear that’s inside the wall.
PEX A Plumbing Made Easy Video
Watch my full step-by-step tutorial for even more tips. I think it’ll be extremely helpful if you’re using PEX A for the first time
Plumbing is just one aspect of bathroom renovations.
If you want to unlock all my bathroom remodeling videos, courses, and personal coaching, join Home Repair Tutor today – it’s one of the best online resources for anyone renovating a bathroom. Tap the button below to learn more
Jeff