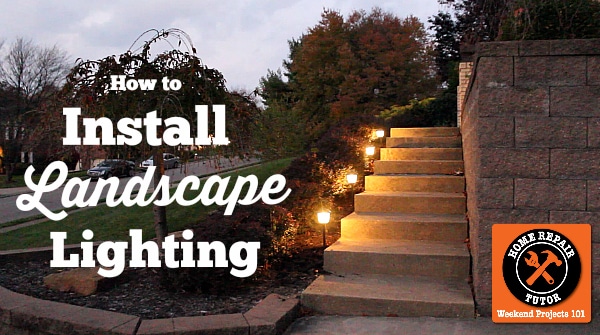
Halloween is today!! It’s my favorite time of year.
Orange leaves. Charlie Brown specials.
We get a lot of visitors from October thru December. And our home has a lot of steps leading to the front door and I’d hate to see trick-or-treaters get hurt.
So today’s tutorial is about installing outdoor landscape lighting.
Plus, outdoor lighting helps deter mischievous teenage Halloweeners.
Let’s just say I’d prefer eggs to stay in the fridge not on my garage door.
This project is super easy, takes only a few hours, and totally gives your home awesome curb appeal.
You’ll be surprised at how straight forward it is – I swear it’s harder to make pumpkin pie (which I love, haha).
The key to outdoor landscape lighting is figuring out all the supplies.
So I did that for you
- Power Pack ($59 each)
- Path Lights ($20 each)
- Flood Lights ($15 each)
- 12/2 Low Voltage Wire ($14 for 50 feet)
- Phillips Head Screw Driver ($5)
- Combination Stripper ($15)
- Measuring Tape ($15)
- Marker (FREE)
- Hammer Drill ($59)
- Tapcon Screws ($15)
- Driver Bit ($5)
- Lineman’s Pliers ($20)
- Spade Shovel or Half-Moon Edger ($19)
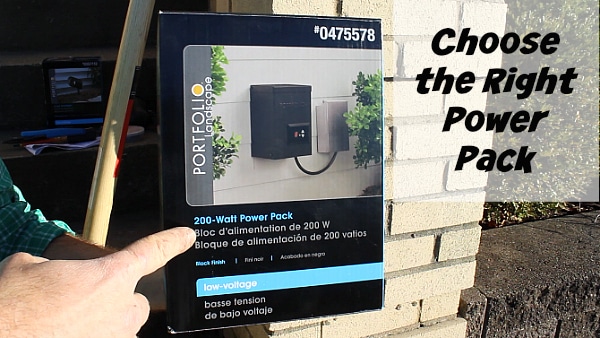
You’ll want to choose a power pack that can handle the power output of your lights.
The power pack in this tutorial can handle 200W.
That’s plenty of power for the 50W flood light and four 11W path lights I used.
The total power of the lights is 94W and the power pack can handle 200W.
I chose 12/2 low voltage wire so that there wasn’t a voltage drop for the light farthest from the power pack.
Voltage drops cause lights to dim and you’ll be a little upset when you experience it (especially after all the hard work you did).
The first step in the installation is to attach the power pack to the house.
That can be a little tricky if you have brick.
But I have a several tips to make it a breeze.
How to attach the landscape lighting power pack to brick (without cursing up a storm)
You’ll want to strategically place the power pack next to an exterior outlet.
Hopefully that outlet is a GFCI (ground fault circuit interrupter), too!!!
GFCIs are required by code for exterior electrical outlets because of moisture.
Dry fit the power pack next to the GFCI so that it’s power cord will plug into the outlet.
Measure the distance between the mounting holes on the power pack.
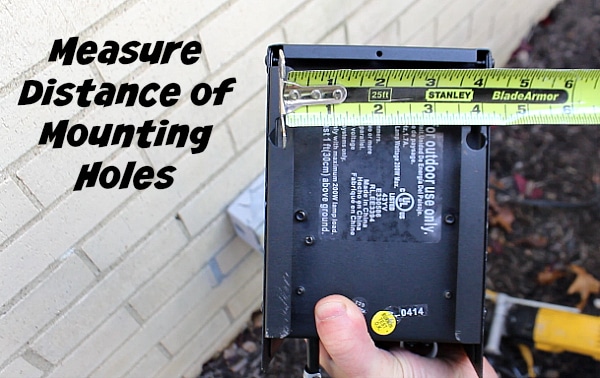
Transfer this measurement over to the mortar. NOT the brick.
It’s way easier to drill through mortar than brick.
I placed two dots on the mortar using a Crayola marker (which I stole from my kids, haha).
Drill through the mortar with a Tapcon drill bit inserted into a hammer drill.
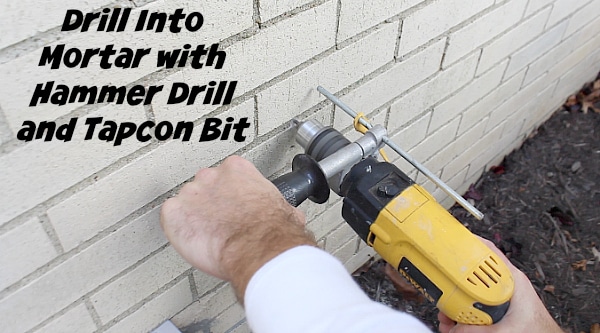
Set the hammer drill to the the hammer setting and make the drilled hole depth be 1/4 inch more than the length of the Tapcon screw.
The drill bit usually comes with the Tapcon screws.
Don’t worry, my video shows you how to do this step.
Screw the Tapcons into the holes using the hammer drill and a hex driver bit.
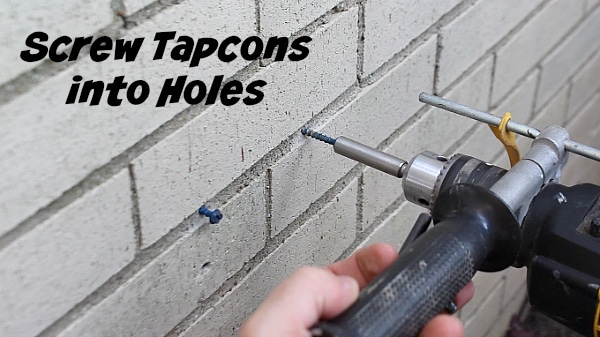
The screws should come out about 1/2 inch out from the brick.
This allows the power pack to hang from the wall.
Now it’s time to add the 12/2 low voltage wire to the power pack.
Again, this is way simpler than you think.
Wiring low voltage landscape lighting, easier than parallel parking
Parallel parking can be a real pain in the butt.
I’d rather do this project any day over parking in the city.
After mounting the power pack you’ll need to figure out where to put your landscape lights.
Then you have to dig a 6 inch trench from the power pack to the light locations.
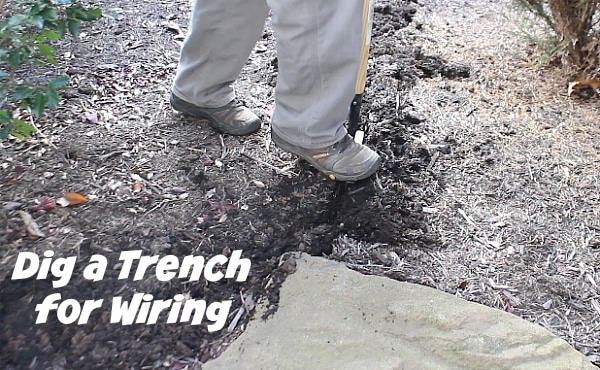
I used a half-moon edger but you can also use a spade shovel.
By the way, the the half-moon edger is great for edging flower beds and I you can check out that tutorial here.
Once the trench is made attach the low voltage wire to the power pack.
Strip 3/4 of an inch of insulation from both wires, twist their copper with lineman’s pliers, and slide the copper wire under the silver terminals on the power pack.
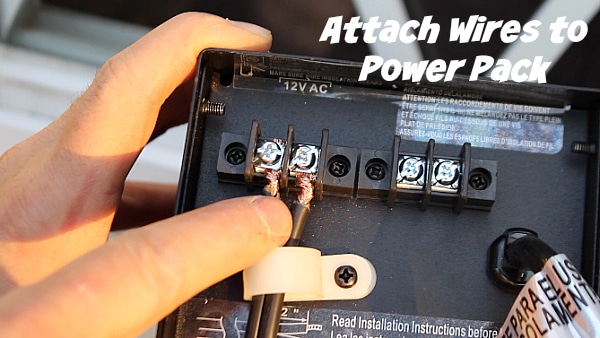
I have some really great tips to make this process easy.
You can watch the video below for all the details.
I’m not trying to be cool in the video by wearing sunglass, we were getting unseasonably nice weather in Pittsburgh. Sun in Pittsburgh? Who knew?
What’s Next
Man, I’m happy with our landscape lighting. It makes all the difference with how our house looks at night.
Just be sure to use an exterior GFCI – our detailed tutorial is great for that.
If you’re doing a bathroom remodel and need help, join one of our online courses – they’ll make your bathroom renovation much easier!
Let me know if you have any questions and I’ll do my best to help.
Thanks as always for reading, watching, and being part of our awesome community.
Cheers,
Jeff

I could sure use a hammer drill, I want to start some work in the basement and I need it due to all the concrete, it would sure make life easier for me.
Your tutorials are so handy and easy to follow! I love tools and this one would be a great addition to my tool box! I’m sure I can find many uses for it!
I’ll tell you Kathy, you’ll find a lot of uses. From fixing concrete steps to mounting hardware in cinderblock. It’s amazing how easy a hammer drill makes it to do this kind of stuff around the house 😀
I’m beginning my home remodeling and a simple drill won’t cut it. I’m an amateur when remodeling and your website has really made me feel confident that I can do almost anything. I’m glad that there’s a place can go for tips and ideas. I truly appreciate your site, thank you.
Congrats Jesus on beginning your DIY adventure. Don’t worry, we’re all beginners but the one thing that helps is the curiosity to learn about this stuff. You’ll never go wrong by asking questions and putting that knowledge into action 😀
A hammer drill would be an awesome tool for re-modeling and re-wiring my garage. I need to install conduit through the block walls of the garage for things like lighting and plug sockets.
You just made me shudder a little Britt. All that conduit and block!!
Slick video, had no idea what a hammer drill was. Got 3 quotes for outdoor lighting and the cheapest was $2800!!! DIY is the way to go. Thanks. Nolan
WHOA!! $2800.
That’s a lot of dinero Nolan.
Well worth it to try and DIY 😀
I have a whole back patio that I have to remove the walls and the ceiling do too some dumb idiot who did not put my rm together right, my drills are not working
I want to add lighting to the patio area under the deck.
I feel inspired! I wanted to do this, but know I know it’s a project I can handle. I’m all about keeping power usage low, so my outdoor landscape lighting choice will LED. Bright and green. Thanks for another helpful tutorial and give away!
Thanks Lisa. I believe the brand of landscaping light I used comes in LED. The only reason I chose not to go that route is the bulbs didn’t put off enough light.
Great tutorial. Those lights would be a great addition along our driveway. As for the hammer drill, I need to replace the entrance hatch on my crawl space and it would be just the ticket for drilling into the brick to attach it.
Love the article. I have a few areas I want to address in front and this was most helpful.
JB
Amazing DIY help!! I’m so tired of my solar lights just not lighting up!! As far as the drill, who the heck knows what I would use it on. If I had in my hand tonight I could use it to scare the trick or treaters! LOL thanks again!!
Great project for dressing up the property, Jeff. I’ve got brick on the house. Concrete block on and in the garage. Time to put stuff on both surfaces. Earlier attempts got aided by neighbor who has a hammer drill, but I would sure like my own.
Awesome! I want to put holes in concrete to set up some temporary fencing.
Jeff, I’m sure that what took you 2 hours would most likely take me 2 weeks, but your steps surely do look nice! That hammer drill might be just what I need to drill through a deck screw that’s causing me some trouble, and I’d also love to install a small shelf on the bricks next to the front door. Our last home had stone in front and one of them jutted out just enough to set a coffee cup on while we used the keys to get in the door. (I know, keyless entry, but too expensive right now). Hope you have a great, uneventful week!
I will use the hammer drill to install shelving, gladiator strips and conduit for additional outlets in my garage and basement.
Hi Jeff,
Great tutorial. For me this is a real ‘need’, not just curb appeal.
We do not have streetlights and many people have fallen walking to my door.
One broke her nose! Another his glasses, and one twisted an ankle severely.
I have someone who could help me with this,[ without charging me a fortune] but does not have the correct tool.
The lighting on this street is non existent, friends are getting up there in years………
This would help so much!
thank you,
Char
I’m moving into a new construction house and will need to hang workshop related shelving and “stuff” on block basement walls. This hammer drill would be awesome for that. Keep up the good work. Learning a lot from you.
Boy the things I could get done with this. All of my outer walls are brick and trying to remodel with new drywall is tough work and this would make it so much easier because I don’t have the space to put fur strips up everywhere. The way my exterior is I could use this to place the wiring for landscape lighting. I can’t dig the places I need but I could run off of a line running along the foundation. I could run lines to put in electrical outlets.
GREAT information!! After this, I could really use the hammer drill to mount my new power pack for my new outdoor lighting that I need…um, want.
Thanks!
Haha, good point Sherri about needing the drill for the new lights. Love you humor 😀
This winter I will put a rec room in my unfinished basement.
My neighbors have a lot of hard wired landscaping lights. But I notice every few years the lights are changed out. I did not ask, but I expect the winter in Chicago gets them.
I’m lazy, so I use solar lights. My present set is 10 years old and going strong. The important part is how I store them for the winter. Solar lights need to operate every day or the batteries fail. So they must be kept outside. Snow blows up into the fixture and corrodes the electronics. This is not the as rain. I slip a zip lock bag over the head of the light. The bottom of the bag remains open a bit because I can’t close it around the stake on the light. The open bag allows any condensation to drip out. I take all the solar lights and stick them in a large piece of Styrofoam ( or a box of dirt) and place them on top of my covered air conditioner. I place a couple of bricks on the foam so the wind is not a problem. I’m crossing my fingers to see them operate for the 11TH year.
WOW, 10 years and counting. You’re obviously doing a lot of good stuff to keep the lights going strong Joe.
Thanks for the great tips.
Doing a basement bathroom and having to install two by fours to the concrete walls. Using tapcons and you “have” to have a hammer drill to drill into this old 1954 concrete. Something I don’t have and could really use!
That’s a great project Jerry. You’re right, you’ll totally need a hammer drill for this project.
This past week I went to a Schluter seminar and they discussed using Kerdi board rather than drywall for this kind of application.
You may want to check out their website. They have a ton of great tutorials, too
Here’s the link
http://www.schluter.com/
Hey Jeff & DYI friends!
I really could use the Porter Cable Hammer Drill to install hanger eye bolts for a chain lift I am planning to install in my shop ( need to drill through large headers) . I bought the chain lift ( antique but good condition ) at a garage sale from a friend who is in his late 80s and just finished a ground-up restoration of his 1957 4-door Bel Air Chevy that he bought new.
I plan on using the chain lift to lift my John Deere lawn tractor to change blades, etc. It will come in handy in helping my friends work on their “stuff” also, as one of my neighbors and I are the “go to guys” to fix all sorts of stuff in the neighborhood here in Auburn, AL.
Have a great day from Auburn, AL. Nick
That Chevy sounds like a beautiful car Nick.
Man, you’re serious about changing tractor blades. No joking around in your garage, haha.
Great article and looks so simple. I will need to try this for the backyard. I just put in 6 solar walkway lights along our front yard path. They look and work great but I still enjoy hardwiring them.
I could use the drill for installing a new gutter drain. I am running a drain from the front yard to the back yard where the water will divert to our rain garden instead of contributing to basement flooding. The drain goes along our foundation concrete where I need to attach it. The drill will get the job done quickly.
You make your tutorials seem so easy that even women like me with little experience can do them. I need the hammer drill to install the lights to highlight a new flower bed I had put in late last Fall and for other projects too. Thanks for sharing.
Love your tutorials! I actually don’t have anything to use it on right now, but I have a best friend who owns a home, and could use this!! I’d gift it to him since he’s done so much for me!
Thank you for the chance to make his day!
Joey
That looks like a project my husband would have to do, despite what you say. 🙂 Trust me on this — he frequently has to fix my attempts. Anyway, I could use that tool to replace or fix our handrail on the steps. It is a thing, metal one, and it broke away, so it is attached at the top of the steps, but not at the bottom. I really want new ones, but it is awkwardly placed. This tool, I think, could at least help with the problem!
One project??-I have a slew if projects that I could use that drill on!
I would love to have this hammer drill to install my outdoor lighting per your instructions. I am done waiting on my husband yo do it so I decided to do it myself! I love doing stuff like this because I can see the finished product! Thanks for the inspiration, Jeff!
I’ve got tons of basement work to do.
A hammer drill is a great tool for any persons toolbox. I want to install a tool area in the basement and drilling holes in the concrete wall would be a breeze with a hammer drill.
Hey Jeff I installed landscape lighting at my house. I wanted to expand my lighting. I have a 300W transformer but i had used up most of the 300W with my 50w light halogen bulbs. So i ordered some LED landscape lights online and the 50W lights went to 9W each so i had lots of room to expand. Another tip: don’t use the “daylight white” color lights in your landscape…it just does not look right. Use the “soft white” color LED lights.
Jeff thanks again for all of your videos. They are great. Love them. They really help.
Love your tip Steve, especially since this problem might one that other DIYers experience. So changing out the bulbs would be a good solution.
Good suggestion on the “soft white” color, too 😀
I’m constantly helping my folks out remodeling their basement. A hammer drill would come in so handy.
I want to put peg board up to organize my tools in my basement. Was just reading how to do it last week AND I need a hanger drill to attach to my concrete basement walls. Would be super to win this!
I’ve wanted to hang some holiday wreaths on either side of our garage door, but have always been nervous about drilling into brick. I would love to win this hammer drill. Thanks for the chance!
Hammer drill would be great in my project to build pergola over my back patio
Keep those tutorials coming, please, Jeff. I’m in a condo, and can’t make any changes to the balcony walls. So I’m using concrete blocks to drill through to hang things from, make planters from, and also drill through shells for projects. I could really use this tool. Thanks so much.
Well my youngest son just purchased his first home. He would sure be able to use the drill on a deck project he wants to start soon. Being a new home owner at the age of 24 he has worked so hard and I know he would really enjoy it. Then he won’t have to borrow dads (lol).
This is great, just the video I needed to end my 7-year procrastination on this project at our house!
I would love to surprise my Elderly Parents with the Outdoor Landscape Lighting project for their house, not only to spruce up their front yard, but also for their protection to be able to see outside when they walk if they don’t have the lights on. 🙂 I sure could use a handy dandy Hammer Drill to help me with this Project! 🙂
Dear Jeff,
I’m a huge fan of your DIY instructions. I’m the manager of a small motel – without a maintenance man! So, everything is done by MOI! I’m not the most skilled person, so I do rely heavily on your knowledge, skill and recommendations. That said, there are many projects around here where I could find uses for this Hammer Drill…one of the first would be to install some outdoor lighting along the cement walkway. I just finished reading/watching a site to show me how to replace cement steps…that is going to be a huge project for me – and I know this tool would serve me well. Thanks again for all you do!
This drill would definitely be useful for several upcoming projects. Not being naturally “handy” I’ve learned that having the right tool for the job is crucial !
Upcoming projects for me include:
1) reattaching two outdoor electrical boxes that the painters dislodged which will require new holes to be drilled into stucco
2) repair and secure wooden arbor that supports a beautiful Carolina Jasmine
3) installing a “hose holder” to my stucco exterior
4) whatever else my wife decides needs to be done !
Keep up the great work. I always look forward to your next newsletter.
LOL, I like point #4 Toby.
We are in the same boat and lets just say we aren’t the captains, haha.
Man, you have a ton of projects coming up. That stucco will make a hammer drill absolutely necessary 😀
I love your projects. They are just what a typical homeowner would be doing. I will be building a false wall in my basement and this hammer drill would fit the bill perfectly. Thanks
You’ll have a lot of drilling in your future James. Especially with basement work. But something tells me you have it under control.
What’s the false wall separating?
We have just finished completely digging out really CRAPPY earth from our front garden, and having good earth put in it’s place, quite a job. We will be adding outdoor lighting as soon as we get the pennies to do this. A gift of this tool sounds just what we need. Thanks for all of your wonderful tips PLUS your sense of humor. Have a good day Joan
Sorry to hear about your tedious project Joan.
At least is sounds like your garden will be a lot better off.
Gotta have some humor when it comes to DIY, right. Cause things don’t always go how you plan 😀
Going to start refinishing part of my basement and yes your hammer drill would really come in handy there. You did a great job on the landscape lighting and I am sure it made a great difference to your home at night and gives you just a little more sense of security at night. I love your tutorials so keep them coming as there is no telling how many people they are reaching and helping.
Thanks Mike, these projects are a lot of fun.
Although I do lose it sometimes and let a curse word slip here or there, haha.
Love your email address. I’m guessing you’re a Reds fan 😀
I would love to win this tool, I am getting ready to hang new shutters on a brick home, so it would come in handy. Plus having a brick home, I would need it to hang the power pack for new outdoor lighting. Love the tutorials.
Hammer drilling would make your project a breeze Laura. I’m guessing you might have to drill into the brick for the shutters.
And that is a real pain with a normal drill.
Send me some pics of your new shutters. That’s a project I might have to do in the near future 😀
Ever since we built our first home we’ve installed solar lights because they are easy to install and don’t have to do and buy all those expensive tools. Don’t get me wrong I would prefer to do what you did but unless I am going to use those tools for other jobs I would not spend anymore then I have too. Your job looks awesome as always. Thanks. AL.
Yes I would like to own that hammer.
I hear ya Al, these tools can add up.
Hammer drills do come in handy though for concrete or cement work. Plus, they do double duty by having the hammering function as well as the drilling function.
So if you need a new drill this is a great option. Although, admittedly I love impact drivers. They are so awesome!!!
I’ve subscribed to you for a while, and this was the first time I had the time to read through a tutorial – I love how you made me feel like I can do this! I am SO going to amaze my family by picking a project – the lighting, (especially if I mounted something on our brick foundation!) That would be amazing!
There’s no doubt that you can do this Tanya.
It’s not a hard project. Probably the most important part is picking the right power pack and wiring.
Then make sure you have lights that fit your home’s decor. And if you have any questions feel free to touch base with me 😀
Jeff, you teach me so much, do not ever stop! I SO appreciate the time you take to share, the comprehensive explanations give me the courage to try many projects on my own and have already saved me a lot of money–beginning with first discovering you and fixing my leaking toilet. Myself! No need for an expensive plumber. ANYTHING needs doing you are where I check. Thing is, even when I cannot accomplish myself and need help your tutorials have shown me how something should be done——–meaning—–if I do need to hire someone I can be certain it is being done correctly. Your tutorials are PRICELESS in both instances.
Please do not ever stop…….we NEED you. Again–Thank you!
Char
You made me blush Char!!
I’m no DIY guru, that’s for sure. But doing these projects is fun. Sure, at times they can be frustrating as all heck.
But our homes are a refuge we all need at the end of a long day.
Thanks so much for being you Char 😀
Jeff,
That looks super easy and dresses up the front stairs. That will be definitely something we will do in the future. Every time I watch one of your videos I get the confidence to do it myself. We are planning to finish our basement for a playroom for our 3 young kids! They have already have scribbled on so many of our walls in our house! And we just moved here 6 months ago. They used to have a playroom in our old house 🙁 The hammer drill would be perfect for the basement project!
Keep on inspiring us!
Thanks so much Leila.
Congrats on your new home. I can’t remember if I told you that before, but what a cool adventure.
Basements are so cool for kids. It’s like having a fort, which all kids love having.
Keep me posted on your basement project. I’d love to learn how you do it.
I forgot to mention the lighting is beautiful. I want more outdoor lighting, but I want to wait until I finish our landscaping so I will know exactly wear to place the lights. I still really, really need that hammer/drill.
That’s a good idea Patty to see how the landscaping will turn out. Who knows, you might change your mind about the layout, right.
A new tool will inspire my husband to pursue the “honey do” list. LOL
New tools definitely light a fire under my tush 😀
Such a wonderful tutorial. Put in some landscape lights and did a spotlight on the flagpole. Ran the wire up the pole, hooked up the light, attached it to the pole, and ran the wire back down to finish the other lights. Now, the flag light is turned on when the other lights go on. Better than having 2 controls.
Well, I guess it did not like my first post so I’ll try again and keep it short.
Thanks for the chance to win!
I really need to bite the bullet and purchase some decent lights!!
I am getting tired of getting the cheap ones and then have to replace then the next year.
And they don’t light up much anyways!
Thanks!!!!
I am needing to instal grab bars in my bathrooms by the toilet and in the shower and tub.
Jeff, I am so glad to have found out about your do it yourself tutorials. I just bought my own home and don’t have a lot of tools. I too am tired of commercials and appreciate hearing from someone who has used a tool if it is worth purchasing or not. There are so many uses for a hammer drill and would make my home improvement projects so much easier. Thanks Jeff for sharing your insight! 🙂 Have a Blessed Day!
I would love to win this hammer drill …I purchased a ‘Pavilion’ (2 years ago) and also a Storage Shed (over a year ago) unfortunately both are still in the boxes. I really need to get them put up and the hammer drill would really come in handy to make these projects easier. I love your outdoor lighting (which is another thing I purchased almost 3 years ago… still in the boxes) uggg! You have inspired me to get started, I really love your DIY videos, they are super helpful. Thank you.
My garage needs some work, this tool would work great. You did a great job on the Landscape Lighting. You have so many helpful tips. Thanks for the giveaway!
I would love tis because i purchased outdoor lights and i have been trying to figure out how to do exactly this, drill into brick/mortar!! This post was PERFECT timing. I will post/send a picture as soon as I can! Thanks so much for all that you share!!
This hammer drill will make hanging shelves in my basement shop so much easier.
I have been teaching myself how do complete my own DIY projects (though fairly simple – faucet replacement, replacing outlets, repairing settling cracks, etc). I have combed your site more than once for help. A spring hail storm tore up the lighting I have around the gazebo and would like to install something more substantial. I think I could learn how to use this drill, right?
I’ve been putting off mounting some outdoor lanterns. Sure could use this.
Wow, you made this look SO easy! This is definitely a project for my “to do” list! Alas, because it’s an “elective” ;-p it’ll be down near the bottom, but it’s something I’ve been wanting to do for 15 yrs. Until now, I haven’t felt like I could begin to tackle it. Your supply list is particularly helpful. There’s little more aggravating than getting knee-deep into a project and discovering that you need something you have to stop, clean up and run to the store for!
The hammer drill looks like it will come in handy for this and many other tasks, thanks for the recommendation and the chance to win it!
Bonus point tip: when you’re digging the trench, be certain *beforehand* that you’re not shoving that edger into any underground wires or pipes! Several years ago, when digging up some scrub/brush from a patch next to the house, we came across a gas line that supposedly wasn’t there. Fortunately, we hadn’t been forceful or used anything more than a plain old shovel. We got the gas co out to the house to investigate, at which point they tore up part of the road, sidewalk, a strip of yard and the basement wall to reroute and reconnect! <:-o
Really, really good point Kiki about the underground utilities.
In Pennsylvania we can call 811 and they’ll come out and mark up all the underground lines. So this is a great thing to do before any digging project.
I would love to win the hammer drill for my daughter. She is buying a house next year when she gets married and I know she will have lots of projects to use it for. Thanks for the opportunity!
Hi Jeff,
I installed solar outdoor lights about two years ago, but they’re no longer working. I have a long, curving front path up to my home, with large bushes on both sides. I can’t see the steps at night because the bushes block the light from the porch light. I installed the solar lights between the bushes, but I suspect they don’t soak up enough sun to be effective. It probably wasn’t the best idea for the original homeowner to plant bushes on BOTH sides of the stone path, but they do look nice! I would need a hammer drill to attach the power pack to the brick exterior wall of my house. In addition, I have an old metal awning for a porch roof in the rear of the house. One side has come loose so it needs to be repaired or replaced. It’s kind of ugly so I would like to build a nicer, larger porch roof, but will have to drill into brick (which I’ve never done before!). Thanks for all your inspiration! Laura
Living in Vegas, there is concrete (and stucco) everywhere! I love landscaping/gardening, and have a lot of ideas that have to do with drilling into the concrete walls that surround our yard. For right now, I get away with the conventional drill. But having a hammer drill would make these gardening ideas come to life…easier and faster. And going through stucco isn’t always a homeowners idea of fun. I been known to say to myself….now if I had a hammer drill, this project would be so much easier. Anyway, I love your mailings, and love the idea of there being no ads or commercials. Thanks for such a great DIY posting, and I’m sure glad I found your site. Keep up the awesome job buddy. ; )
I just came upon your site a couple days ago, and think it is great with so many helpful hints. And the giveaways, of course!
Being 62 years old, I have completed many home repair and home renovation projects.
But I have never owned a hammer drill. (don’t know why).
I am wanting to build a new deck in the back, and I know a tool like this would be very helpful.
I would very much like to win this hammer drill.
Thanks for all you do!
Tom
Jeff,
The addition of bubble wrap for window insulation is a great idea. I have found 12″ & 24″ wide material but do any of our DYI community know of a source for 36″? It would make the jobs a lot easier and cleaner looking.
Nick
Boy, I’m not sure Nick. You could try to see if Walmart has it or a large store like Staples. I know what you mean by getting a bigger size. It’ll make the insulation work better too.
Jeff, I appreciate and respect your options and recommendations in your newsletters.
Like “Wet&Forget”. I never would have found this time saver on my own. I showed the outdoor lighting to my wife and she wants to see what’s available. Keep up the great work.
THANKS
David Nelson
I would love this tool. My boyfriend and I are just getting started on remodeling a room in my house into a pantry. Three of the walls are cinderblock, the 4th wall is lathe and plaster covered in stucco and the floor is concrete so we are going to need all of the help that we can get. I hope I will, my pantry will get done much faster. And thanks so much for all of your emails, I’m learning tons.
– I LOVE the pics and step by step instructions. Makes me feel like I CAN do this and all the things you show.. It really EMPOWERS me to try.. Thank you 🙂
Excellent tutorial-as they all are. I need to strengthen some posts on our front porch and drilling into brick will be part of that. I’m going to wait to see if I win before looking into getting a hammer drill on my own.
Jeff, your video was the best! It really helped me install my outdoor lighting today. I had all the tools except for the hammer-drill which I had to borrow. It would really be nice to win yours and I would have one of my own.
Just want to thank you again for all the helpful tutorial videos you have made. I have used many of them now.. Thanks again for all your help…. Hank
Wow Hand, you’re the man. Talk about not wasting any time. Jeez louise!!!
Send me some pics of your project. I’d love to see it 😀
You’ve given me The Answer! Our landscapers have demolished our path lights in both the front and back yard! We can do what you did, how you did it and with what you used! Thanks!
Aw, that’s fantastic Patty.
Well, not the part about your landscapers kinda being dummies but the part about you doing it yourself 😀
I just brought home a 100+ yr old black iron gate that was torn down at my place of employment. I was originally going to put it in my garden, but thought it would look nice if it was attached to the white random rock next to our garage. The Hammer Drill sounds like it would be the perfect tool for the job!
That black iron gate probably looks so cool Sue. When you get it installed I’d love to see how it turns out.
Make sure to send me some pics 😀
Jeff, your tutorials are the best. I have plenty of projects that require a hammer-drill but didn’t know that’s what I needed.
I think you’d love it Ingrid. Hammer drills are so awesome at chewing up cement. You’ll save a ton of time.
Your tutorials are so interesting and helpful. I have Hammer Drill already included on my wishlist and would greatly appreciate winning one from you! I have an assortment of chores and crafts that could utilize a hammer drill. I have plans to add a rain collection system near the back of my house so I’ll be adapting my concrete patio to that project. I also want to add a Catio at the other end of the same patio so our 4 cats can safely be outside to get some fresh air and admire the birds. Of course, that would make it safe for the birds, too! As to crafts, I’m in the planning process of collecting some basalt rock to shape into small grist mills for miniature working displays. All fun stuff to do!
I’ve never heard of a Catio Marcia but it sounds way cool.
I would like this hammer drill, for my gutter installation/ rain barrel projects
And any other projects that are inspired by your tutorials.
Thanks Rosh. Good for you for installing rain barrels. They’re a great way to conserve water and be more green. My neighbors did this and have a fantastic water source for watering flowers all summer.
This would be an awesome tool to have at my house. I have to put up outside security lights at my house. I live in the country and with the recent flood of robberies, I need to get this done soon. Plus I would love to do this project if I knew how to put in electrical outlets outside!. Thanks for all your wisdom! I love these tutorials.
Glad the tutorials have inspired you Lori. You may want some motion sensor lights to deter any would-be robbers. But it appears as though you’re on top of it 😀
We could find good use for this while we are building our house
I just retired from being a nursing supervisor in local hospital in April so I was outside most of the summer doing what needed done. I ran out of time but my plans r to put low voltage lighting around the house and could use a hammer drill because I need to attach to cement. I ever heard of a hammer drill but I’m impressed with what I read about it. Right now I’m taking a month and redoing a room in my house…..I should’ve waited to start this in January…..After the holidays but the bedroom is coming together. What takes up a lot of time is getting on you tube to investigate how things r done. Your tutorials have been a huge help that I come to your site first and find a very excellent explanation of what I want to do. Thanks so much for you time, talent and great tutorials. They rock!
Thanks Linda and congrats on your retirement. Although it sounds as if you might be busier now than you were at the hospital.
Are you redoing your master bedroom?
I sure would like to win this for my DD and S-I-L. They are very concerned about the future and they are trying to build a room in the basement where they can go for safety —a tornado for instance—and since the basement is all concrete–this drill would be perfect for them—thanks for the chance to win one—Jean
If they’re going to frame out the basement a hammer drill would come in handy for sure.
Sounds like they get some tornados out there way. Always a good idea to have a safe room to stay in 😉
would love to try the hammer drill. I can think of so many projects right now!!! I may start with an outdoor one.
I was planning on borrowing a hammer drill to mount new posts for my deck rail through a 2×10 and into poured concrete posts. The Porter Cable drill would come in mighty handy.
As far as outdoor lighting goes a suggestion would be to not mount the power unit too close to the ground because the transformer attracts fire ants. Also, be sure to not block or scratch the plastic in front of any light sensors or the lights will always stay on.
(voice of experience) I have one set of lights that don’t go off until 10-11AM and come on about 3 in the afternoon because I scratched the cover with a line trimmer.
BTW, know a good way to polish plastic to get the surface “clear” again?
Thanks Walk for your tips and sharing your experience with the sensors.
Sometimes these lights can be a bit finicky to say the least.
As far as getting plastic clear again I’d try an automotive kit for getting headlights clear. You can find them in the automotive section of Walmart or auto parts stores 😀
A hammer drill would be an excellent addition to our tool arsenal… could definitely use it for landscape lighting and other fun projects. Thanks, as always, for your awesome tutorials… they are very helpful! Keep ’em coming!
Thanks Winona, I’ll keep the tutorials coming. I think I’ve got a few good ones up my sleeve 😀
We just completed a brick mailbox and have a slate address plate that we will be attaching. A hammer drill would surely help with that. Plus we live on a cement slab. I’m sure at some point we will need to drill into that. Thanks for the opportunity.
You have lots of drilling in your future Kathleen, and a hammer drill would certainly come in handy 😀
Love your site and your good humour! Very refreshing and lots of fun! Just curious to whom won the drill! Keep up the good work Jeff! Tks! 😉
Thanks so much Adriana.
Kiki won the drill. Sorry I didn’t announce it yet on the post. You know what, I’ll do that right now 😀
Hope you like the next tutorials. There will be some giveaways that could really help