Nrdly
Get Nrdly Free Trial Built with Nrdly

The Best Grout Removal Tools for Tile Shower Floors

What’s the best grout removal tool for your tile shower floor?

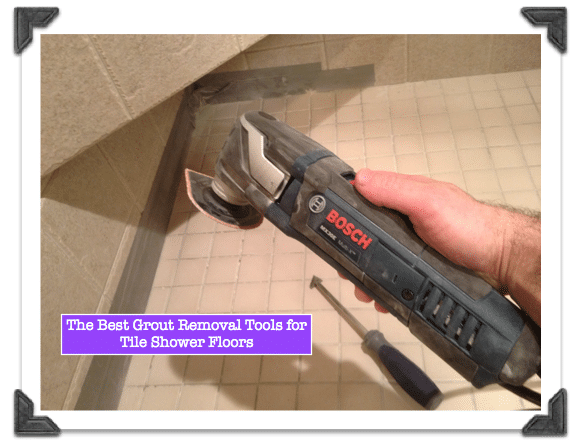
Hands down it’s Bosch’s oscillating multi-tool because removing grout won’t take you 7 days and you’ll still have most of your hair at the end of this project.

With that said, you should also use the triangular grout removal tool that can be found at Lowe’s. It’s great for detail work where the Bosch multi-tool cannot reach.

If your tile shower floor has grout that won’t clean then grout removal is your only option. This was our predicament after trying multiple cleaning solutions but seeing only marginal results.

Grout is like icing on the cake and literally makes a tile project either look fantastic or hideous.

There are several grout removal tips I want to share with you so you don’t make the same mistakes as me, save time and reduce your aggravation level to the point whereby you’ll be called the buddha of bathroom remodeling.

Here are the supplies you’ll need to remove grout from your tile shower floor

Trust me, I know firsthand that the Bosch multi-tool is expensive, but if you’re serious about removing grout and doing other handyman stuff you’ll love it.

So let’s get started!!

Why the Bosch Multi-Tool is Great

You can buy manual grout removal tools for as little as $10. And they’ll work fine for small jobs.

But if you don’t want to be removing grout for the next seven days you need to use an oscillating multi-tool like the Bosch Multi X or Fein Multimaster.

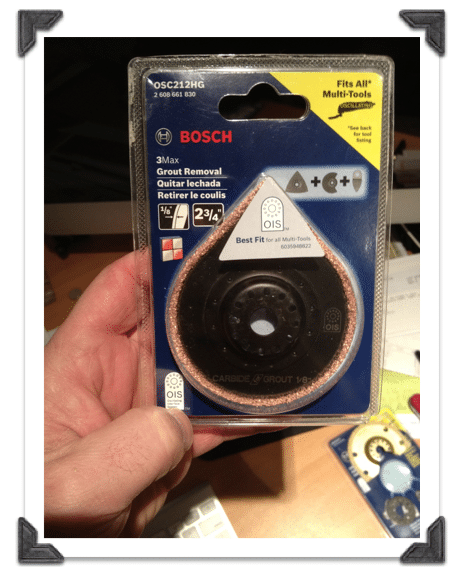
You’ll have to buy the grout removal attachment because it’s the only one they don’t include in the kit (I read the box about 5 times to make sure).  I admit it’s not cheap at $24. However, it will chew right through your old grout with no problem. As you can see from the picture the attachment will fit into grout joints as small as 1/8 inch.

Best Grout Removal Tools for Shower Tile Floors-Use the Bosch Grout Attachment on the Multi Tool

This grout line size is typical in old showers that have 4 x 4-inch tiles. But you can also purchase an attachment that removes grout joints as small as 1/16 inch wide.

Measure your joints before buying the attachment to see which width is best for your project.

Shower Floor Grout Removal: Minimal Yet Important Prep Work

Here’s where I made a HUGE mistake.

The Bosch oscillating tool is super awesome but it will take a bite out of your vertical tile if you’re not careful. I bumped the adjacent wall tile a few times and scratched the surface. Not a big deal but the perfectionist in me was unhappy.

Add a protective layer of duct tape to the wall tile in case you do bump it with the Bosch multi-tool.

You should add two rows of tape, and two layers may not be a bad idea.

Removing the shower floor grout that’s close to the wall is tricky. Primarily because you need to get the attachment close to the intersection of these surfaces without it touching the wall tile.

So use duct tape to protect your vertical wall tiles from nicks and scrapes.

How to Use the Best Grout Removal Tools for Tile Shower Floors

Add the grout removal attachment to the Bosch multi-tool and turn it on. What I like about the Bosch oscillating tool is that it has a soft start that gradually ramps up power.

Adjust the speed setting to between 3-6. Always use the lowest setting that does the best job.

The last thing you need is for the attachment to cut through a shower pan or damage the substrate that holds the tile in place. Which begs the following question.

How much grout do you need to remove?

The amount of grout that needs to be removed should equal 1/2 the thickness of the tile. So, if your tile is 1/4 inch thick you should remove approximately 1/8 inch of grout.

Who told me this?

I called the technical support line of Custom Building Products and the technical advisor I spoke with provided this advice. The question came up because there’s a shower pan underneath our 2 x 2-inch shower floor tile. If the shower pan is cut by the grout removal tool then water will leak down through the kitchen ceiling on the first floor of our house.

NOT GOOD!!!

Fortunately, there is a carbide grit line on the grout removal attachment of the Bosh multi-tool. You can control the depth of your grinding by not plunging the attachment beyond this line. Admittedly it is super difficult to watch the grit line but at least it gives you a rough idea of how deep you can go with the grout removal.

The nice thing about the grout attachment is that it can remove both sanded and unsanded grout. Sanded grout is typically used for 1/8 inch or wider grout lines. Unsanded grout can be used for 1/8 inch or smaller grout lines.

If the grout attachment clogs, which will most likely happen because this is a messy job, you can clean it with a wire brush until the grit is exposed.

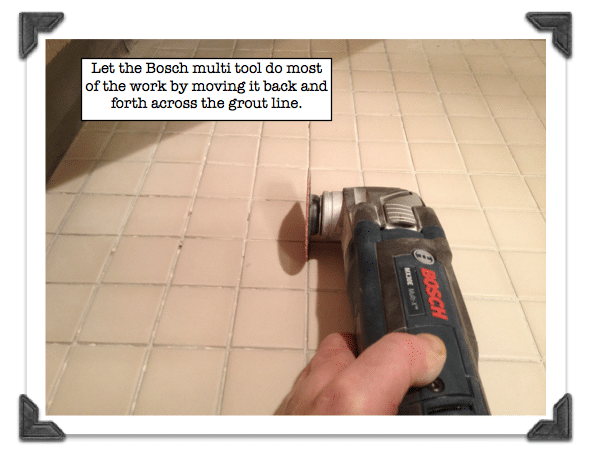
Remove your grout with the Bosch multi-tool by moving it back and forth along the grout line. Keep the attachment aligned with the grout and don’t apply too much side pressure because you could accidentally damage the shower tile floor. Let the multi-tool do the work and only apply minimal downward pressure (just enough to move the attachment down into the grout line).

Best Grout Removal Tools for Shower Tile Floors-Let the Bosch multi tool do most of the work

Here’s the tricky part, there might be some grout that can only be removed by slightly angling (10 degrees at best) the multi-tool attachment. If you do this carefully you’ll be fine. You can also use the triangular grout removal tool from Lowe’s to scrape off excess grout on the edges of the tile or in areas where the Bosch multi-tool is too big.

How do you remove shower floor tile GROUT that’s close to the vertical tile intersection?

Remove as much of the grout as you can with the Bosch multi-tool then use the triangular grout removal tool to scrape the rest out. Place the triangular carbide blade flush with the vertical tile and in line with the grout, you need to take out. Then pull the carbide blade away from the vertical tile.

Do this a few times to remove the grout. It sounds like fingernails on a chalkboard so keep your ear protection in place.

Vacuum the grout dust frequently so you can see your progress and ensure you’re not gouging the shower pan or cement board.  I worked with 4 tiles at a time and would vacuum the grout lines around them.

Removing grout isn’t an easy job (it takes the patience of a kindergarten teacher) but you can definitely do it yourself. Here’s a breakdown of the tips from above

  • Use the Bosch multi-tool with a grout attachment to remove large sections of grout
  • Employ the triangular grout removal tool from Lowe’s to scrape grout out of tight spaces
  • Apply duct tape on surfaces that you don’t want to scrape
  • Grout removal should be 1/2 the thickness of your tile
  • Work in small sections to eliminate frustration
  • Vacuum grout lines frequently to see your work
  • If you’re in a bathroom turn on the fan to exhaust grout dust outside
  • Finally, use a dust mask, safety glasses, and ear protection (you’re removing grout not your body’s sense of smell, sight, and hearing)


What’s Next

Oscillating multi-tools are also great for removing caulk in showers or bathtubs.

And if you’re doing a bathroom floor we highly recommend using an angle grinder with a dust extraction system.

Hopefully, all these tips help you with your project!!

If you’re doing a bathroom remodel and need help, join one of our online courses – they’ll make your bathroom renovation much easier!

Let me know if you have any questions and I’ll do my best to help.

Cheers,

Jeff


Grout Removal, Grout Removal Tools

  1. Ira Morse says:

    I learn so many things when every time I visit your blog… no need for me to hire an expert coz with this guide I can do it with my own. By the way thanks for sharing!

    1. Thanks Ira, you made my day 🙂

      When I see comments like yours it makes me want to keep finding great ideas to share.

      Hope you had a wonderful weekend!!

  2. Great walk-through here! Grout is probably my least favorite bathroom project. I really need to redo mine and was looking for a decent tutorial with tips and tricks, guess I found it here. I am on board with Bosch products all my power tools are in the Bosch line. Thanks for the time spent on this post it’s going to be a great help to me.

    1. I’m with Kevin, grout is no fun to take out. The Bosch multi tool made short order of the grout, it’s a beast and absolute must for this project.

      Let me know how things work out and always feel free to email your questions.

  3. Jared says:

    Three things that I have a different opinion on than yourself.

    1. Fein makes a superior tool to Bosch.

    2. Diamond grout removal blades work better than carbide blades.

    3. Grout routs have a diamond shaped tip that work much better than the triangle.

    1. Hi Jared,

      Thanks for your candid feedback. Fein makes really awesome tools. But at the time I needed a multi tool ASAP, like in 30 minutes. And the local Lowe’s is literally 15 minutes away. Unfortunately they don’t carry Fein.

      I will disagree with your assessment of Bosch, though. My Multi X chewed through the grout like a champ and it didn’t die like the Dremel. So, it saved my butt. Normal homeowners like myself don’t really need to buy super high end tools to get the job done. And it doesn’t make financial sense either if you’re only using the tool on the weekends. Bosch is great for serious DIYers who want a dependable product.

      🙂

      Jeff

  4. Caroline says:

    Wow I wish I had seen this a week ago. I had ‘cleaned’ away so much of the grout that my feet were getting sliced by shower tiles. I only have 20 square feet of shower floor and some small lines on the wall that need a touch up. Do you think I need such a powerful rotary tool? Will a one amp work?
    Thank you for the simple, straight forward, tutorial. Mahalo!

    1. Thanks Caroline, if your grout is already coming loose and you think you can use a manual tool then go for it.

      The manual tools only cost about $10 but can be time consuming and hard on the hands.

      If you’re going to have other projects that require cutting then you should consider a Dremel or Bosch multi-tool. They are super fantastic!!

      Sorry to hear about your feet getting sliced. That’s no fun at all 🙁

  5. Shelby says:

    Hi Jeff,

    My husband is pulling up the tile on the floor of our shower and replacing them. Is there anything we can do to provide a little extra protection regarding the shower pan? Is there any type of sealant we could use prior to relaying the floor? We just really want to be sure everything is sealed up really well so we don’t have any leaks in the future.

    Thanks!

    1. Hi Shelby,

      You should look into using RedGard. It’s a waterproofing product that you can buy at any home store.

      I use it on walls in showers. I can’t be certain how it will work for your exact project but think it will work for what you need.

      Let me know your thoughts 🙂

      Jeff

  6. Joyce says:

    Hi! This was interesting and motivational as I started removing damaged ceramic tiles in the bathroom from a house that was built in 1925. I have found replacements that fit.
    I brought the Dremel not knowing the amount of time involved and took several breaks. I put soap on the other tiles to keep from damaging, but now I will go back for the other tiles and put duct tape, as I do not want to damage any more. (smile). After removing the grout how do I actually remove the tile off of the wall without damaging others? The new problem is how to remove the cement on the wall?

    Again thanks for the motivation!!!

    1. Thanks Joyce for your question and kind words.

      One way to remove the old tile is to drill a hole in the center and use a hammer & chisel to tap out the tile. Start from the center and work your way outward, being careful not to damage the other tiles.

      You will have to buy a ceramic drill bit. Another good piece of advice is to place some tape on the tile so that the drill bit will “bite” and not slide off.

      Let me know if this makes sense and if you have any other questions. I’d be happy to help.

  7. anne says:

    Appreciate your information. I have started to see mold along the grout line between the floor and wall in the shower. Suggestions on any other steps to take during the replacement process? I’ve heard bleach and sufficient time to dry prior to re-grouting, then following up with sealant. There is a tumbled stone tile in the shower.
    Thanks for any feedback.

    1. Davin says:

      Anne,
      The line where the wall and floor meet should be sealed with caulk, not grout. This is a common error even many pros make. After removing the old grout use a bathroom caulk that is 100% silicone, with no additives. Make sure you check the expiration date on the silicone tube as well.

      Good luck!

  8. Ryan says:

    Hi Jeff,
    Thanks for this article. Great article.
    Top notch. Powerful. Precise. Little heavy, but thats its durability. This kit came with all the bells and whistles. Using it to remove window framing a window sill. The right tool for the job makes it all the difference in the world. Would highly recommend this to any tool guy.

  9. alison vigne says:

    found the perfect job for someone with OCD – removing grout! Thanks for the tutorial, I came to your site to learn about silicone remover and will power up the hairdryer. As I did my grout removal with a $10 tool (and have a second bathroom) I have taken 2 weeks. The shower recess has dried out well and the grout had a flush of efflorescence which worries me. Do I need to apply a treatment prior to re-grouting?
    Many thanks for your advice – all the way from Australia!

  10. Ashleigh says:

    We are replacing the grout in our shower with epoxy grout. We would like to use it everywhere, including the corners and planes where the vertical tiles meet the shower floor, so that the grout is the same color and instead of using silicone caulk, which would be slightly different in color. Is this a good choice or should we stick with the caulk for these crack-prone areas?

  11. Gabby says:

    Hi!
    I haven’t started my project yet but just finished reading your post and must tell you it made me smile. You made removing grout funny. Thanks for that!!

  12. Jeremy says:

    How long did it take you to remove there grout from your shower with the Bosch? My shower is 3ft x 5ft x 8ft including the ceiling and floor to be done.

  13. Pingback: Home Repair Tutor
  14. Frank Smith says:

    Very well written explanation on regrouting. Tape, depth and tools are well brought out! Thank you.

    1. Thanks Frank, glad the tutorial was helpful. Always feel free to ask any questions. I’d be happy to help.

  15. Kaylen says:

    Jeff – I’ve started removing the old grout, but have found that certain sections are quite moist and almost paste like and other sections are completely dried out. Note: it’s been about a week since the last shower in there. Do I need to wait until the old grout has completely dried out before putting in new grout over it? Thanks!

  16. Tal says:

    Good walk through Jeff. Does this same removal process apply to wall tile too?
    Thx

  17. Roy says:

    I’ve used red guard for several years now. This stuff is awesome. I did some remodeling in my kitchen and painted this stuff under the sink to guard against any potential leaks. I did the same think at my moms house, she has very old plumbing. It saved me after I did the remodel in my kitchen. I came home to a pretty good drip under my sink one day but thanks to the red guard it just puddled instead of being soaked up by the wood. It’s not cheap but it is well worth it where ever there is a chance of water getting to sheet rock or wood.

  18. George says:

    Hi just look at the article it’s good info. Another thing to be careful of is if the bathroom has heated floor out sode the shower. Don’t cut to deep into the heating element. Very cold floor after fixing grout.

Leave a Reply

Your email address will not be published. Required fields are marked *