Nrdly
Get Nrdly Free Trial Built with Nrdly

Install Weather Stripping Around Outside Doors

Sometimes older homes feel like they’re made of swiss cheese.

One way to stop ants, drafts, and high utility bills is to add weather stripping to outside doors.

I’ve done this to several of our rentals and it’s way easy. Trust me, you don’t have to be Bob Vila.

Lately one of our rentals here in the City of Champions had some unwanted guests in the form of sugar ants.

Even though we’ve had the pest control company apply their ant treatment the little buggers are persistent.

And apparently, they like sneaking into the kitchen through the side entry door.

So this tutorial shows you how I fixed this small insect problem while making the home more energy-efficient.

Here’s the supply list:

I guarantee you can do this yourself.

Don’t let a little carpentry prevent you from lowering your utility bills and stopping calls to the pest control service.

I’ll be your Yoda if you’ll be Luke Skywalker or Princess Leia, she was a Jedi after all but didn’t know it. Let’s get started!


Weather Stripping to Top of Door Frame

Standard packets of weather stripping for doors have three sections that cover the right, left, and top portion of your door frame.

Ants were entering through our door at the lower right-hand side. Just the tiniest gap was all it took for them to infiltrate the kitchen.
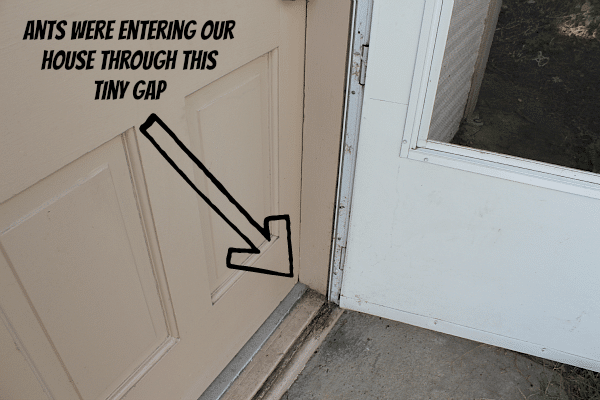
Tiny Gap in Door

Like me, you’ll need to measure the top of your door frame from left to right and hang the corresponding piece of weather stripping.
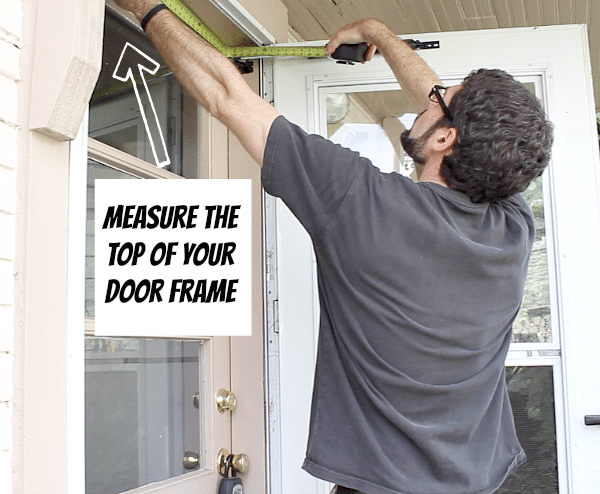
Measure the Top of Your Door Frame

In case I forget, here’s a DIY Bonus Tip: before you cut weather stripping pull back the foam seal from the wood frame.
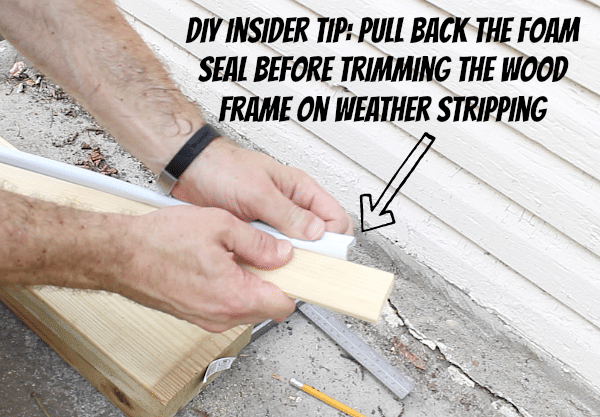
DIY Insider Tip for Weather Stripping

Once the wood portion of the weather stripping is cut to size push the foam seal back into place and cut any excess with scissors. This will ensure a smooth look instead of a jagged appearance that occurs from wood saws.

Cut the Foam Seal with Scissors

Tack the top weatherstrip in place with 4d finish nails. Make this process easier by pre-drilling holes every 6 to 8 inches along the strip. Ensure your drilled holes are slightly smaller in diameter than the finish nails.
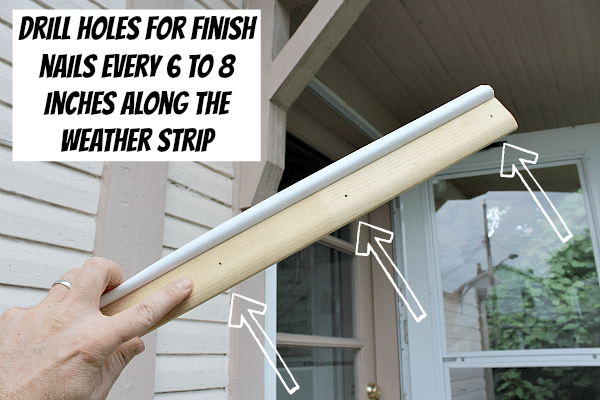
Drilling Holes for Finish Nails

Dry fit the strip to see if it fits. Then add some caulk to the side that will meet up with the door frame.
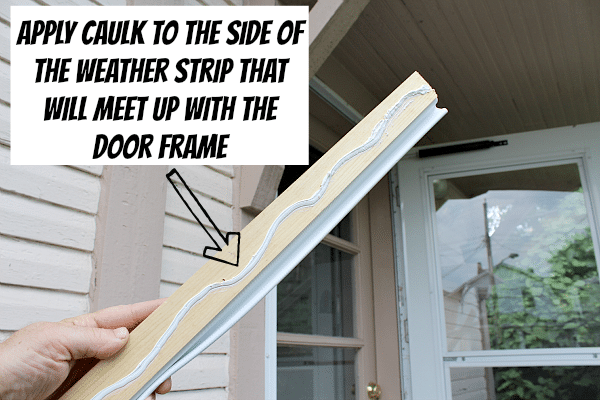
Apply Caulk to Weather Strip

Push the weatherstrip against your closed door.  The vinyl seal should face the door and smush against it creating a tight fit.

Then proceed with tacking the strip in place with the 4d nails and your hammer. You can have a spouse or friend hold the strip while you hammer away. But don’t be afraid to do it by yourself.  Hey, I did and it wasn’t bad at all.
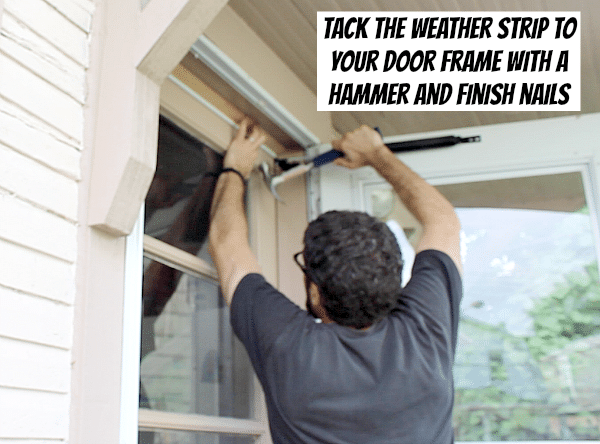
Tacking the Weather Strip in Place

Installing Weather Stripping to Your Door Jambs

Now the tricky part. You’ll need to trace the profile of the top weather strip on the right and left jamb sections.

Rest a scrap piece of weather stripping flush with the jamb sections. Use a pencil to trace the profile as I did in the picture below. 
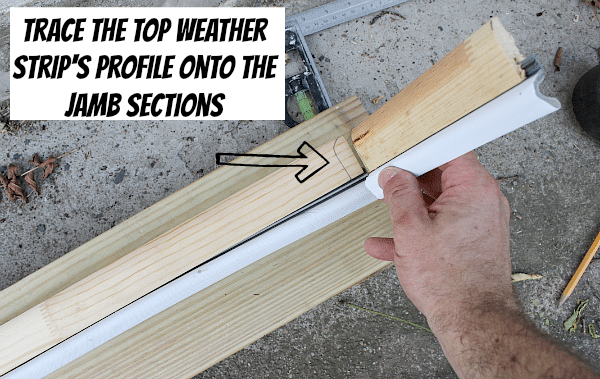
Tracing the Top Strip's Profile

Use a jigsaw or coping saw to cut this profile into the jamb weather stripping.

This will allow the right and left sections of weather stripping to sit perfectly against the top strip.

Watch this video below for the complete step-by-step process and you’ll see for yourself how easy it is. I think even my kids could do this with some supervision.

To install the left and right sections of weather stripping, measure from the bottom of the top weatherstrip to the door threshold.

Remember this distance. Take your measuring tape, attach it to the top of the profiled weatherstrip for the right or left jamb, and pull it to the distance your need.

Cut your jamb weather strips to size and check that they fit.

Then drill holes for your finish nails, caulk the back of the weather strips, and push them flush with your door.

Tack both of these weatherstrips in a place like you did for the top one. Go back and caulk any gaps between the stripping and door frame.

I used Alex Plus Caulk by Dap because it’s paintable and will allow me to make the weather strips look like part of the door frame after they get painted.

Booyah!!
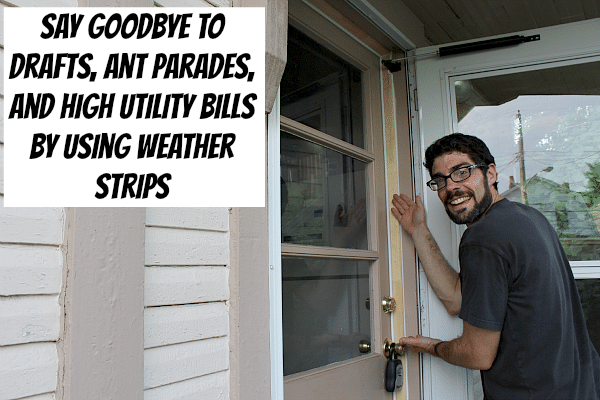
Weather Strips Make Houses Comfortable

What’s Next

Weatherstripping helps deter ants and pests. If you still have problems with spiders try Miss Muffet’s Revenge – it’s a great option.

If you’re doing a bathroom remodel and need help, join one of our online courses – they’ll make your bathroom renovation much easier!

Let me know if you have any questions and I’ll do my best to help.

Thanks as always for reading, watching, and being part of our awesome community.

Cheers,

Jeff


Exterior Door Weather Stripping

  1. Nice job Jeff! Great video and great tips. Here’s another project to add to my list.

    1. Haha, my list seems to get bigger every day. Maybe we can help each other out-lol.

      1. Awsome idea! If you start driving right now, and don’t stop, you can help me hang a door by tomorrow night, just hold it for a minute while I slip the hinge pins in. It’s only a little more than a couple thousand miles if you want to pop over.

        1. I’m on my way, haha πŸ˜‰

          You know I’d totally lend you a hand if we were in the same zip code.

  2. Jeremy says:

    Hey Jeff, great info! Very well explained. Thank you.
    One piece of (unsolicited) technical advice:
    Your music track is too loud. It is hard to hear what you are saying. Also, the music has vocals in it, so that competes with your words, too. I totally get that you had to finish this video quickly, but if you mix your music down to about -20db and your voice to about -8db, you should be good. Also, music that has no vocals is better. We want to hear you!
    Thanks and keep up the great work!
    Jeremy (TV Editor)

    1. Thanks Jeremy, I really appreciate your advice because the site is for every to enjoy. So, I’ll take out the music and leave it the way it originally was before editing within YouTube. Moving forward I’ll most likely add music within my own software instead of Google’s. Do you have a suggestion as to where to find good tunes?

      1. Jeremy says:

        Freeplay Music is a good place. Most stuff should be free for youtube use.

        1. Jeremy,

          That’s exactly what I need. Thanks so much because the audio was bugging me, too. Btw, I took all the songs off the videos that were edited within YouTube. Now you can hear the directions a lot better.

          Jeff

  3. Elizabeth T says:

    Hi Jeff, where did you find that weather stripping? I got some from Home Depot last winter to replace the worn out ones on my front door. They are so flimsy and thin, they didn’t even close the gap. I had to return them.

    1. Hi Elizabeth,

      These weather strips were purchased at Lowe’s and were about $22. So, not a bad price for sealing doors and reducing utility bills. It’s amazing how easy this project is and the cool part is that you don’t need any special tools. Let me know if you have any questions.

      Jeff

  4. Deb says:

    After seeing this, I realize that, even as more advanced DIYers, we’ve been doing this particular project all wrong.

    So thanks so much for the clear instructions. Can’t wait to apply them.

    1. You’re welcome Deb but I’m sure you have a ton of great ideas of your own.

      I can’t tell you how many projects I’ve messed up – I’d prefer not to count!!

      We all have to experiment to see what works best. Keep up your DIYing πŸ™‚

  5. Irene Foss says:

    A very long time ago, I’m embarrassed to say how long ago, I bought a pretty unfinished door for our front entry.

    My son measured the old door and then cut the new door to the same length. I sanded the door smooth on both sides then doing one side at a time I stained and then put several coats of polyurethane. It was beautiful and when my friends and family saw it all hung up they gave me lots of compliments. Which were accepted greedily by me. LOL Little did they notice my disapointment that the door is too short. So for a very long time I have been pushing a rug up against it to stop the drafts of cold air. After watching your video I finally had an idea of what to do for a fix. How about if a strip of molding in the thickness needed to fill the gap was added and some weather stripping added onto the strip of molding to stop the cold drafts of air. Would that work and can you please give me your advice please?

    1. It sounds like a beautiful door Irene.

      How big is your gap?

      You may be able to get away with just adding a door sweep. There are several that work very well.

      But if your gap is pretty substantial I think you have a good plan in place. You could tack a filler strip to the bottom then paint or stain it to match the door.

      Make sure to get the same species of wood as your door so that the stain looks the same. Then polyurethane all sides, including the bottom.

      This prevents the filler from expanding and contracting (and also limits the ability of the door to start closing improperly).

      But let me know the size of your gap πŸ˜‰

  6. Terri Hughes says:

    Thanks so much for your great tips!

    1. You’re super welcome Terri. I hope they help you πŸ˜‰

  7. Katherine Love says:

    THANK YOU!!! Followed your step by step direction and had both doors done in no time flat!! My family can ALREADY feel a difference, without the draft and the insects crawling in to get warm our family will be much happier and warmer this winter!! And our heating bill won’t give Mom and Dad a STROKE when it comes!! Thank you very much!!

    1. Fantastic Katherine!!!

      I’m so excited that you already saw a big difference. It’s been frigid here and I’m sure you’re in the same boat.

      Use that money saved on heating bills for something fun πŸ™‚

      I’m thinking a night out with your husband – lol.

  8. This is great, Jeff. We have sugar ants in the summer and really cold drafts in the winter! I’m going to give it a try. Thanks for the super clear instructions.

    1. You’re welcome Jan. I hope the weather stripping stops those sugar ants and drafts. Those are two things that can be a pain in the rear end.

      Let me know if you have any questions along the way πŸ™‚

  9. Lisa says:

    My husband and I bought our house last summer and I am totally overwhelmed with all of the house projects there are. There are a gazillion things to do and I am a brand new baby in terms of my house repair knowledge. This article helps though. All the stinkbugs are coming in and I think this will help keep them out. I’d also like to install a doorsweep on each exterior door. I have so many questions still though. Do storm doors need weather stripping and sweeps as well? Our storm doors look pretty rough anyway. Should we replace them first? Do we need to replace our doors too? Are the jambs bad? I have no idea where to even start. Everytime I think I’m going to do a simple fit for a simple problem it turns into a whole thing where I have to do like three other big projects first. Send help…

  10. Terri says:

    My exterior doors have wooden doorstops that don’t have weatherstripping and don’t have grooves to accept weatherstripping. Would I need to remove these in order to install the type of weatherstripping that you used? The house is 60 yrs old and there are so many coats of paint that it’s hard to see how they could be removed (or they may be milled into the jambs?)

Leave a Reply

Your email address will not be published. Required fields are marked *