Nrdly
Get Nrdly Free Trial Built with Nrdly

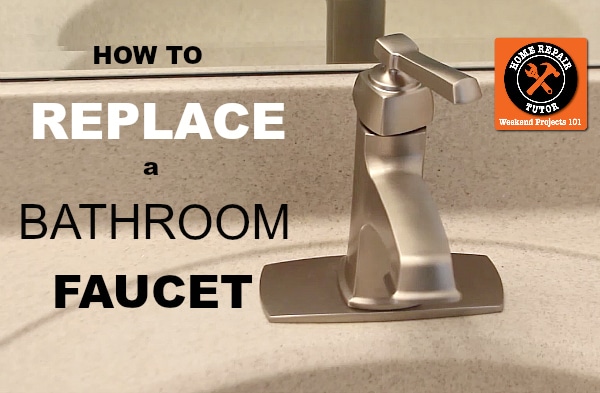
How to Replace a Bathroom Faucet

Do you wanna learn how to replace a bathroom faucet?

Maybe the prior homeowner had bad taste?

Or the current faucet just isn’t your style?

You can easily do this project BUT you’ll need the right tools and tips.

Hey, that’s where I come in!!

I’ll show you three tools that make swapping out faucets easy.

I’m going to giveaway my favorite one, so don’t miss out 😀

Several years ago I tried to remove a faucet in a rental I was rehabbing.

Keep in mind I was a beginner DIYer.

After 3 hours of blood, sweat and a few curse words that began with “S” I finally got the faucet off the sink.

It should have taken me 10 minutes.

What a WASTE of time.

I don’t want you to experience the same mistakes.

You’ll have a much happier experience after reading and watching my secret tips.

Here’s the supply list for today’s bathroom faucet project

Let’s dive into this tutorial 😀

How to remove a bathroom faucet without cursing 

I’ve had my share of curse words.

Especially when doing plumbing, but you can easily avoid this favorite American pastime.

The first step is to turn the shutoff valves to the off position by turning them clockwise until they stop.
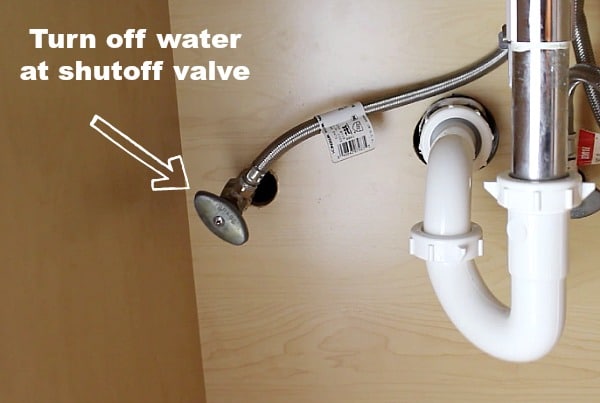
Turn off water

This stops the flow of water to your faucet.

If for some reason your shutoff valves don’t work you’ll have to turn the water off at the main water valve.

Water main valves are typically in a basement or utility room.

Place your plastic container under the P-Trap.

Then unscrew the slip nuts holding the P-Trap to the drain and pipe coming from your wall.
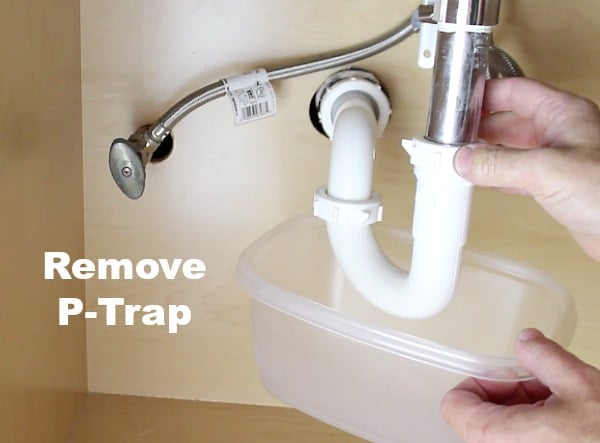
Remove P-Trap

Turn the slip nuts counterclockwise by hand or with channel locks.

As you loosen the slip nut that connects the P-Trap to the goose neck coming from the wall you’ll see water flow from the pipes.

THIS IS NORMAL.

The water in the P-Trap prevents sewer gas from entering your bathroom through your sink.

As a side note, if you bathroom does have that sewer smell it’s probably due to

  1. A dry sink P-Trap
  2. A dry shower or tub P-Trap
  3. Your toilet needing a new wax ring

Water can be good or bad.

When it comes to preventing sewer gas, water is your best friend!

TOOL TIME.

Grab either a basin wrench or Ridgid Faucet & Sink Installer tool.

Reach up under the sink, attach the basin or Ridgid tool on the supply line nuts, and turn the tool clockwise.

Do this for both the hot and cold water supply lines.
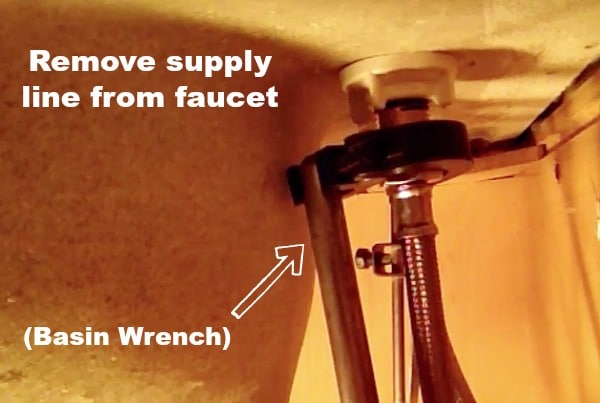
Remove faucet supply line

This will loosen the nuts and allow you to remove the supply lines from the faucet.

Use the same tool to loosen the plastic nuts that hold the faucet to the sink.
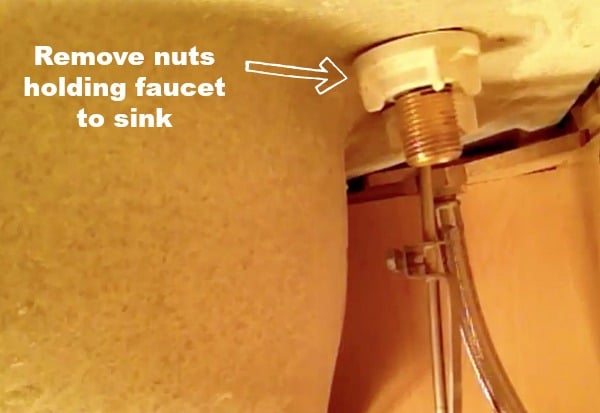
Remove faucet nuts

Plus, if you have trouble you can spray these nuts with WD-40 and come back in 15 minutes to try the process over again.

It’s AMAZING what WD-40 can do to loosen stuck objects.

Once the faucet nuts are removed you can pull the old faucet up from the sink.

Using these tools will totally save your a TON of time and prevent bloody knuckles.

It’s (in my humble opinion) near impossible to use a standard wrench to remove a bathroom faucet.

A basin wrench or Ridgid Faucet & Sink Installer tool are AWESOME.

The next step is to take out the old drain.

Scary?

Not at all.

Remove the clip holding the pivot rod to the clevis strap.

Slide the clevis strap off the pivot rod then turn the drain clockwise with channel locks.

Don’t worry, I show you how to do all of this in the video tutorial 😀

You’ll then be able to pull the top of the drain out from the sink.

Your drain will likely be disgusting.

Clean it thoroughly with rags and water or in my case I used Clorox wipes.

Also clean off the area where the old faucet used to be.

Now you’re ready for the replace the old faucet with a bright and shiny new one!

Installing your new bathroom faucet: steal these tips to make your life easier

First things first.

Make sure you have the right size faucet.

Measure the distance between the holes in the sink.
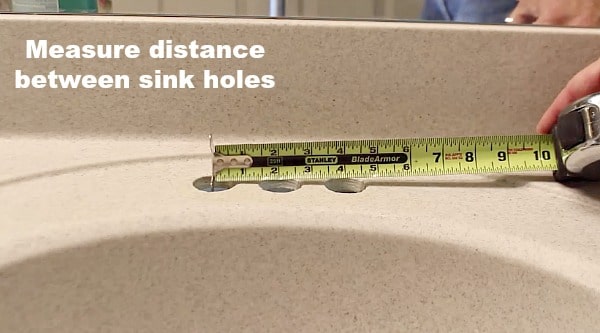
Measure sink holes

If you only have one hole then your life is easy already, haha.

In this example the holes are 4 inches apart.

Buy a new faucet that fits this dimension.

What brand of faucet should you consider?

Here are my recommendations

  1. Delta
  2. Moen
  3. Kohler
  4. American Standard

Why?

They work, are simple to install, and give you replacement parts for FREE.

I particularly like the free replacement parts.

Let me share why I really love Delta.

They replaced our oil rubbed bronze faucet handles for free.

The handles were chipping at the bottom due to hard water deposits.

Each handle would have been $50 but Delta sent them at no cost.

NICE!!

Check out my video to see the complete step-by-step of how to replace a bathroom faucet.

The first 5 minutes shows you how to remove your old faucet and at the 5:30 mark I begin the faucet installation process.

This week’s video is a bit long but I wanted to make sure you got a super thorough explanation.

What’s Next

If you want to make swapping out water supply lines easy then check out Fluidmaster’s Click Seal connectors, they’re awesome.

If you’re doing a bathroom remodel and need help, join one of our online courses – they’ll make your bathroom renovation much easier!

Let me know if you have any questions and I’ll do my best to help.

Thanks as always for reading, watching, and being part of our awesome community.

Cheers,

Jeff

Replace a Bathroom Faucet

  1. Celene R says:

    Thank you! My mother needs several faucets replaced in her home and cannot find anyone willing to take such a small job without charging a premium. I’m going to be the one to have to do it when my boys are on spring break so this instruction would not have come at a more welcome time. Thank you again.

    I could certainly use the tool, also!

    1. Glad you like the video Celene.

      Your projects would certainly go a lot smoother with the Ridgid tool.

      I tend to hear the same story from other DIYers about contractors not wanting to do these smaller jobs.

      Don’t worry though, you’ll be able to help your mom and make short order of her faucet replacements 😀

  2. Kelly says:

    Jeff, your tutorials are so thorough that even I could tackle these household jobs.

    How I would use the Rigid Faucet and Sink Installer tool; I would change out the nasty faucet in my basement bathroom!

    Thank you for another great video!

    1. Awww, thanks so much Kelly.

      I know the video is long but I wanted it to be as detailed as possible.

      That way anyone can replace a bathroom faucet without getting frustrated.

  3. Heather G says:

    Why do I NEED this tool? Well, we just moved to our ‘new’ home (old, but new to us). The 3 bathroom faucets we so gunked up I didn’t even want to brush my teeth with the water coming out. I bought 3 Delta faucets…yes, I love Delta also for many reasons. Hubby replaced my faucet, mainly because I broke the water line trying to clean the gunk off the aerator…water spewing all over, but then that’s a story for another time. I think I know what words you used because I heard similar ones. Needless to say, the other 2 faucets have been sitting in the bathtub for almost 3 months now. Maybe this tool will help to get the other 2 installed…finally!! Or, if nothing else, if I had this tool, I could install them myself. I tried with a regular wrench and it just wasn’t going to work. Thanks for the tips, help, and chance to win an awesome product!

    1. Congrats Heather on your ‘new’ home!!!

      It’s always exciting to start a new home adventure.

      Yep, I bet we shared some similar curse words. But that’s what happens sometimes while DIYing, haha.

      Don’t worry about the faucets in the tub. I’ve had my share of delayed projects.

      There’s no doubt you’d be well served with the Ridgid tool 😀

  4. Marylou J says:

    When it comes to DIY in my home, I’m not the sharpest crayon in the box. Just sayin’. I am a single woman who has to do her own repairs, and apparently, I have to learn the hard way. ;O} I will soon be tackling this very job, and every little help I can get would be a blessing! Thanks for your videos and tutorials…You are now my “go-to” when I have a DIY project to do.

    1. I was kind of having a lousy day Marylou but after reading your sweet words it’s a heck of a lot better 😀

      Any time you need to ask a question feel to do it here or in the Facebook private group.

      I’d be more than happy to lend my ears.

  5. Sue Passe says:

    I hate working upside down. Between the gravity working on me and triyng to see with my bifocals and a flashlight, changing faucets is a dreaded job. The right tools do help so I sure would appreciate the right tool. Thanks, Jeff for this and all your other tutorials. I hate plumbing but you help me feel like I have a chance to get it done!

    1. You can totally do this plumbing job Sue.

      One thing I forgot in the video was to show the nifty headlamp you can wear.

      It really helps with tight and dark projects to wear a light on your head. Of course it’s a bit funny looking but hey, who cares if it works!!!

      This is a fantastic tool tip 😀

  6. Meg says:

    I’m so glad you posted this video. I installed my kitchen sink faucet to update the look, but it wobbles and turns all over the place. The right tools are important, I agree. Also your detailed video will help to ensure that I cannot go wrong when I re-do the job one of these days. Thanks again!

    1. It sounds like one of the nuts is loose Meg.

      If you don’t have a basin wrench it might serve you well to get one.

      I only say this because the basin wrench will be able to grasp all different sizes of nuts. Sometimes a newer sink comes with a special tool and if that tool is missing it can be a little hard to tighten the nuts.

      Let me know if I can help in any way 😀

  7. Tim Wallace says:

    My faucet in the basement bathroom is loose and very stained from hard water deposits that were left unfixed by the previous homeowner. I have thought about trying to take it apart, but with all my other projects I have never even looked into what it takes to get this fixed. Seeing that I can do it that quickly might just move it to the top of my list. I’d also like to replace my faucet in the kitchen so I can add one that has a hand sprayer too.

    1. I have all the confidence in the world Tim that you can quickly remove the old faucets and install new ones. It might take a little effort to get the nuts off the faucet but usually a little WD-40 does the trick.

      If you get stuck always know you can email me or add your question to the private Facebook group where a lot of people can comment 😀

  8. Laura says:

    Hi Jeff,
    I have a question after seeing Mel’s pic. A pipe burst last week and my house was completely flooded. I tore out the sopping wet carpet and pad in the living room and two bedrooms, but assumed the ceramic tile in the kitchen, bathroom and utility room would be okay… Not so? Do I need to take it out and replace it and/or regrout it? Holy cow! Say it ain’t so! Thanks for all your help!! BTW, the underlying floor is a concrete slab, if that makes a difference.
    Laura

    1. Oh my gosh, sorry to hear about your flood Laura.

      Water can be devastating.

      Are your tiles coming off the slap or are they still pretty solid, i.e. not loose?

      Funny thing about tile is that even though the tile itself is somewhat water resistant the grout definitely is not. Water will easily absorb into the grout joint and penetrate the substrate.

      This is a major reason all tile floors in the bathroom or kitchen need a waterproofing membrane under them. Something like Ditra, when properly installed, will help with water spills. But that’s an entirely different tutorial 😀

      1. Laura says:

        I just checked and the tiles don’t seem to be loose. I have no idea how they were installed; whether there was a waterproofing membrane or just glued down….I suppose I should just leave them alone unless they start coming loose…? Assuming water penetrated the grout, what’s the worst that can happen? Thanks, Jeff!!

  9. Lene says:

    The right tool makes any job easier and I love tools! I just signed up for your newsletter and videos and I am hoping to learn how to do my own DIY projects around my home. Changing out my faucets really looks doable with your great instructions…and I would love to win the RIDGID faucet and sink installer tool!

    1. Thanks Lene, with some patience and the right tips you can do a ton of DIY.

      And the best part is that you’ll be much happier with your house.

      Glad you’re enjoying the newsletter and tutorials. If you have any tool questions I’d be happy to help.

      One other tool I recommend is the hand auger. This little guy is a must for those of us that experience clogs in the tub or shower 😀

      1. Laura says:

        Hi Jeff,
        Me again….is it better to use a hand auger than a draino- type product? I’ve never really heard of a hand auger. How do you get it to reach through the brass drain inset with the cross bars? Also, what size or model number are the Channelocks? I went to the hardware store last night to buy some and there was a whole wall of different kinds. The clerk didn’t know what to recommend. Sorry for so many questions! Laura

        1. It’s a lot better to remove the clog with an auger than a chemical product because the chemicals could corrode your pipes. You an either fish the auger though the cross bars or down the overflow pipe in tubs. I recommend getting 12 inch channel locks, they’re also known as tongue and groove pliers. They’ll serve you well for a variety of projects.

  10. Bob Redoutey says:

    Fairly new to your video’s. Always tackling “fixit” things for the family, seem never ending. One of the upcoming projects will be replacing the faucets in the master bathroom, a double vanity of course. I had no idea on how to do it, really glad to find the “tricks”
    Your video’s are the best things I have come across in a long time!

    Thank you for your efforts.

    1. Man Bob, you and Marylou have totally made my day.

      I’m really happy that you like the videos because there are more to come.

      So you’ll be shelling out some dinero for the double vanity faucets! Let me know if you have any questions. I’d be happy to help any time 😀

  11. Mike says:

    Love, love, love this tool! Been putting off buying one ’til my next faucet job comes ’round…but I’ve wanted one for years. Great vid.

    1. Thanks Mike, yah this tool is one that MacGyver would have loved. It’s so versatile and has a wide range or motion for even the tightest situation 😀

  12. Carol Lorraine says:

    I need this tool right now since I have 2 sinks that need the faucets replaced. Please let me win!

  13. Jerry Herrman says:

    I like this tool because it will make removing and installing the nuts under the faucet.
    I plan to use it when I change the bathroom sink faucet. Thanks for the video showing each step..

    Jerry

    1. My pleasure to help Jerry.

  14. Sue says:

    Thank you, I have cheap faucet’s in my home that I want to replace but didn’t know how.Now I do!

    1. You’ll be better served by getting newer brand name faucets Sue. And when you buy them make sure to keep the sticker from the box and put it on the vanity so you can reference the model number if you need any replacement parts 😀

  15. calico says:

    I have two bathroom faucets that really need to be replaced. Would like to try doing it myself, plumbers charge way too much for this and I am on a fixed income. Thanks so much for all your helpful suggestions.

    1. Glad to help Calico. I feel your pain when it comes to hiring out. Sometimes we just don’t have the money to pay someone. This project is way easier with the right tools and knowledge. You can totally do this 😀

  16. Adrianne Hurtig says:

    Another timely post!!! What would I do without you and your help?! Thank you!!

    1. I love helping out Adrianne. Always know that you have a DIY buddy 😀

  17. Sunil says:

    This post has come at an appropriate time. Last spring I had changed all the three faucets in my house along with all the shut off valves as I replaced them all with quarter angle ones. I have a basin wrench from that project and the difficulty I faced was in removing rusted screws holding the faucets. This spring I plan to change the faucets in one of my rental homes and am looking forward to the adventure.

    1. Ahhh, rusted screws and nuts. What a pain in the rear end. Great job Sunil replacing the shutoffs with quarter turn ball valves. Those are the best and will serve you well.

  18. Pat says:

    Hi Jeff, Thank you for your tutorials!! I have had a problem with my kitchen sink and I am certain the process is exactly the same. It not only leaks at the base of the faucet neck but has broken loose at the bottom. I stopped the movement temporarily by using a heavy coat of silicone caulk at the sink level but I am sure it will not last too long. It has for 2 months now but the faucet definately needs to be replaced! I live on a tiny monthly social security income and will have to save up over a few more months just to buy a new faucet. It would save me a lot to have the tool needed to get the job done. My bathroom sink faucet is still working fine. 🙂

    1. You’re quite right Pat, that faucet won’t last for long. Good job trying to keep it still with the caulk.

    2. Noah Laws says:

      Kitchen sinks (mostly) work exactly the same as bathroom sinks (separate sprayer attachments work a little differently). Chances are your retaining nuts need tightened underneath the sink (this will solve the looseness at the base). Sometimes though, it’s because those plastic nuts have cracked with age and stress, which won’t solve. A lot of times leaking at the base of the water stem is a simple gasket fix. Faucets aren’t cheap, so I like to try to repair them whenever possible, rather than replace.

  19. Danny Phillips says:

    Jeff, I have 3 sinks and bath counter tops to install. Your instructions are very clear and comes just as I was making plans. I could sure put the sink and faucet installer tool to good use.

    1. Your hands are full Danny. Glad you liked the instructions. Keep me posted on your bathroom remodeling and if you have any questions 😀

  20. Mike Whaley says:

    i bought an older home two years ago and have spent plenty of time replacing things and updating other things. I usually do the ones that need it the most first and both my bathroom faucets are on my list so this is a tool I would love to try out and give you my feedback on it. Your tutorial was timely and on a level where anyone can tackle this kind of job.
    Thanks and I really enjoy getting these videos

  21. rick b says:

    I am a newly recent fan and love the simple way you teach and explain how to do repairs! My friend and I are moving to florida in the next couple of months and we have a LOT of upgrades and repairs to do! And this sink replacement tutorial could not have come at a better time!
    thanks Jeff!
    rick

  22. Jim B says:

    Thanks for that. I have to replace two in a rental unit soon! Perfect timing. Could really use a tool to make it easier too.

  23. Hi Jeff. Your ideas and tips for the faucet repairs will come in handy for all of us because everybody has faucets at home.

  24. Measuring each hole when replacing a bathroom faucet is a really good tip. Like the faucet in the picture, my bathroom faucet also has three sink holes. Are there any specific faucet designs that I should keep in mind when choosing one from the store? It seems like knowing what designs to keep in mind when looking for a faucet that will fit three sink holes that are four inches apart would make my life a lot easier.

  25. Sandra says:

    Jeff, I did it I replace the faucet in my bathroom and I am feeling pretty good about it. Thanks!

    1. Awesome Sandra!!!

      Great job 🙂

  26. Bob M says:

    Jeff, Love the videos. I’ve been binge watching them since finding homerepairtutor this weekend. There is always so much good information in each one. I replaced a faucet on a pedestal sink a couple of months ago. The fittings were metal, rusted and brutal to get off. Two things make the job easier. The first was to unbolt the basin from the wall. This made access to the fittings a lot easier. The second was “Penetrating Oil”. After struggling most of the first day, I sprayed it in the fittings and let it sit overnight. The next morning, I was able to remove them.

  27. John Ferrell says:

    I like that you mentioned turning the shutoff valves to off. When my plumber was fixing my faucet, he forgot to turn them off and it flooded my house. I would imagine that he has been more careful ever since.

  28. Ken N says:

    Hi John,
    I have replaced faucets before, and can work through the issues that inevitably arise. My problem is that after I finished the installation, a small amount of water remains around the drain in the (bathroom) sink. It’s like the drain piece doesn’t fit down far enough in the drain seat (or it is too thick). Any suggestions? I can’t find any help for this problem on the internet. Many Thabks

  29. Ken N says:

    Sorry I called you John. Thanks JEFF

  30. Stefan Bradley says:

    I am glad that you mentioned that you need to turn off the water at the shutoff valve before replacing a faucet to avoid getting water everywhere. My wife and I need to replace the bathroom faucet so that it matches the rest of the bathroom but need to be careful that we don’t damage our new bathroom. If I am unable to change the faucet by myself, I will find a plumber to quickly and efficiently replace it for me.

  31. Ted says:

    So I started on the first of three faucet replacements, and couldn’t get the retaining nut to budge on the first one. After tearing up my hands for way too long trying to use every different set of pliers I owned, I headed to the internet for advice. I found your site and learned about something called a basin wrench. I was skeptical, but headed off to my local big box home improvement store. I bought the telescoping model for about $20, still not believing it was going to work and planning to return it. Climbed under the sink, slipped it over the nut, and would you believe, it broke the seal instantly and the nut started turning with no problem. Best $20 addition to my tool collection in years, though I think the standard model at $12 would have been fine too). Thank you!

  32. Karen says:

    Hi, the video is great and I was off to buy the tools and thought I’d check through all of the parts. The drainpipe piece with my Peerless faucet seems to be too long – I don’t think the p trap will connect back. Is that possible? Would I have to trim the length of the drainpipe? Thanks for any advice.

Leave a Reply

Your email address will not be published. Required fields are marked *