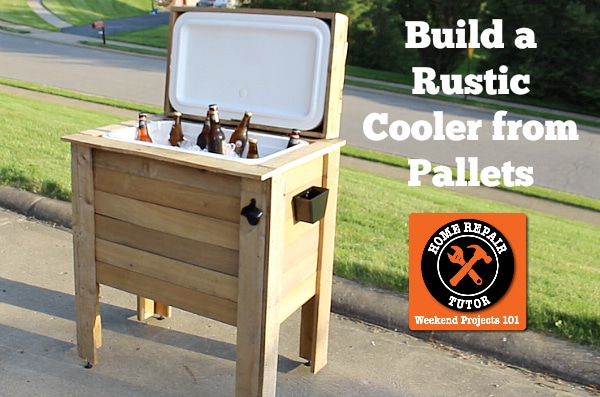
If you want to learn how to build a rustic cooler from pallets then I’ve got a great project.
And the coolest part is that I did it using only one type of saw.
There are great tutorials on the web but they all require a ton of tools.
I know you might not have a table saw, router or miter saw – which can cost hundreds of dollars.
That’s why I made this tutorial. To show you that you can build a rustic cooler with only a few tools.
I used a drill & impact driver plus the Dremel Ultra Saw.
I’m super excited to show what the cooler looks like and I’ve got a way cool surprise at the end!!! 🙂
Supplies for Building a Rustic Cooler
Some of my fans know I make a weekly trek to Lowe’s for supplies.
This past Saturday I discovered the Ultra Saw while sauntering past the tool section (think Shaggy from Scooby Doo).
After checking out the description I was all in and decided to get one, specifically for this project.
You’ll see why I fell in love with it.
Here’s a list of all the supplies for the rustic cooler
- 5 to 8 Pallets
- Power Washer (optional if wood is scrubbable)
- Dremel Ultra-Saw
- 50 Quart Cooler
- Impact Driver or Drill
- Measuring Tape
- Pencil
- Flat Head Screwdriver
- Pliers
- Hammer
- Pry Bar
- Exterior Wood Screws (2 boxes of 75 at $8/Box)
- Titebond Wood Glue
- Elevator Bolts (4 – 5/16 inch x 2 inches)
- T-Nuts (4 – 5/16 inch)
- Hinges (2 – 3 1/2 inch square hinges)
- Speedbor Drill Bit (1 1/4 inch diameter)
- Hose Bibb (3/4 inch)
- PVC Coupling (optional depending on cooler)
- Handle
- Bottle Opener (optional)
- Bottle Cap Catcher (optional)
- Beer (you pick the price, haha)
- These Amazon Affiliate links help keep the lights on…thank you
After you read or watch the tutorial you’ll be able to make the cooler in one day. Okay, maybe a day and a half if you take pool breaks like me.
How to Prep for a Rustic Cooler
Here’s what I discovered: call your local landscape supply company to get free pallets.
They’re super nice and willingly to part with pallets.
Big box stores get paid $15 to $20 for their pallets and this is why they don’t give them away.
Pick out 5 to 8 pallets whose wood slats are in good shape. The slats on my pallets were 5/8 of an inch thick.
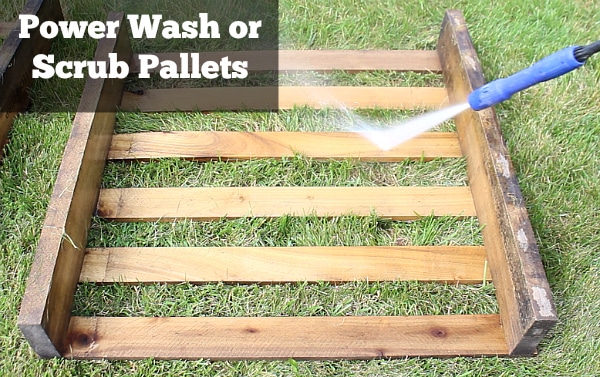
Either hose the pallets down or power wash them.
Power washing the slats made a huge difference in the appearance.
If you can, choose pallets like the ones in the picture below. Slats were attached to only two boards.
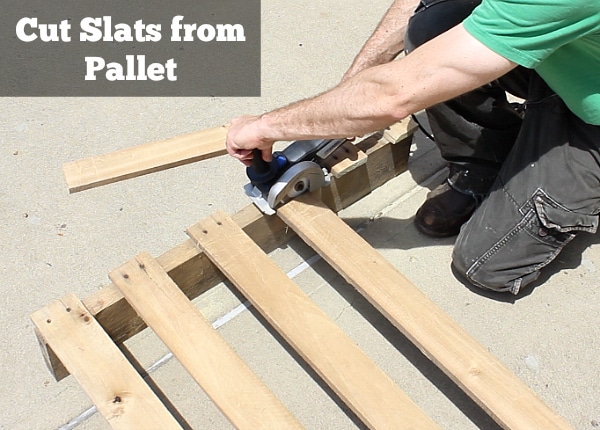
Remove the slat by sawing it off on either end.
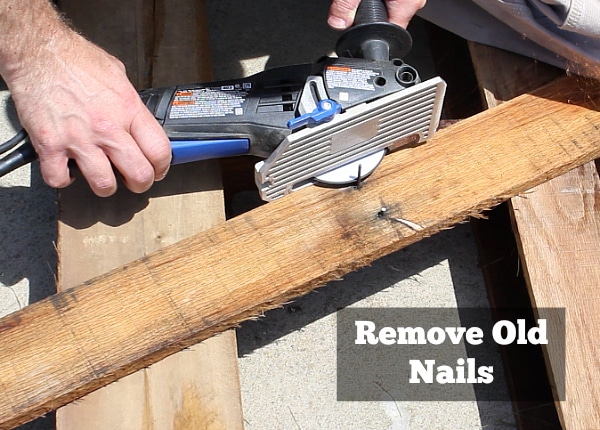
You can use the Ultra Saw to saw off any stubborn nails or screws, too (pretty sweet).
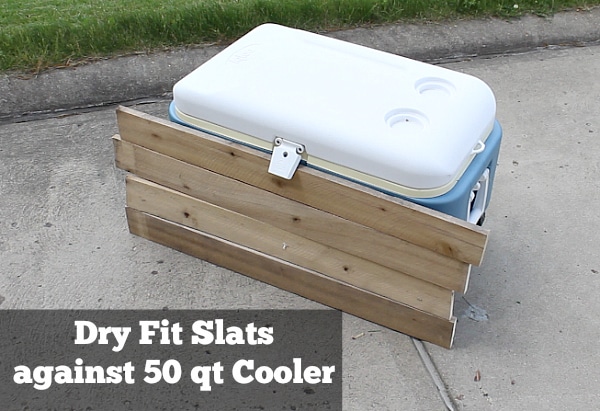
I used a 50 quart Igloo cooler for this project and dry fit the slats to see how many I’d need to cut.
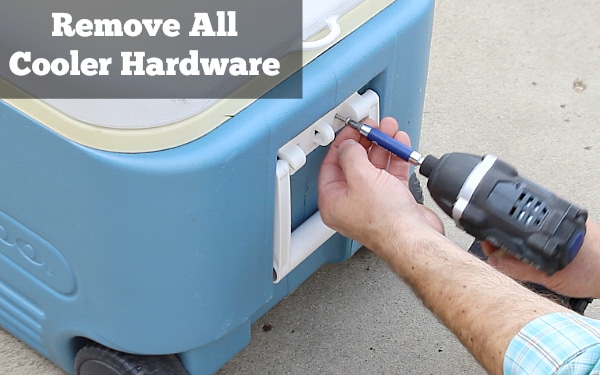
Remove all the hardware from the cooler: handles, wheels, hinges, latches, etc.
Now it’s time to start building the rustic cooler legs and frame.
Building the Rustic Cooler Frame
I’m not the first person to build this kind of cooler.
Heck, I don’t even think mine is the best.
But I can promise you it’s the simplest to build.
Many tutorials use all sorts of tools that cost upwards of $1000.
So I decided to make a cooler that only required a few tools.
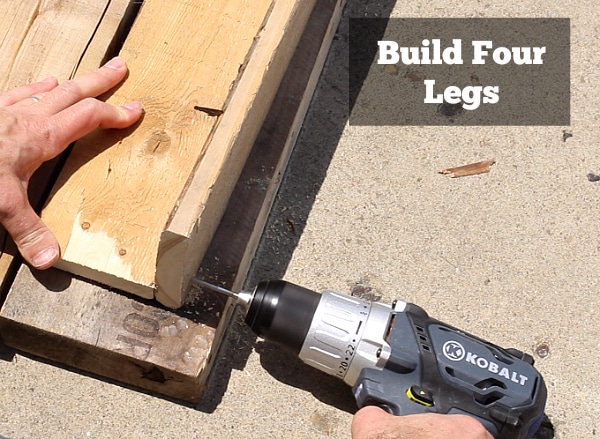
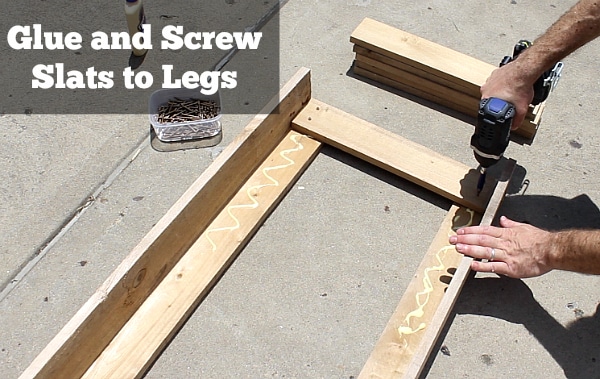
You need to build 4 legs. I did this by cutting 8 slats to 33 inches in length. Attach 2 slats together at a 90 degree angle using wood glue and wood screws.
Pre-drill all your holes so that the wood won’t splinter.
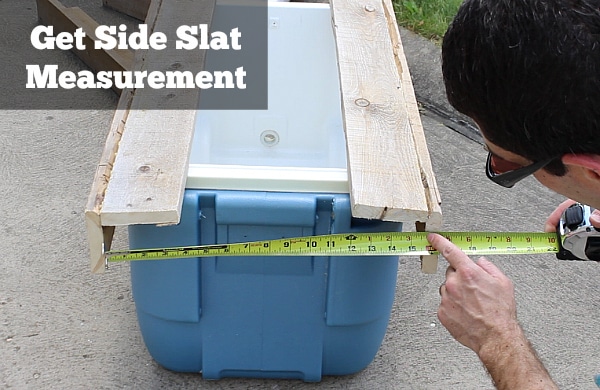
Place two legs on top of the cooler and measure the distance between them. Then add the width of two slats to this measurement. This measurement is for the slats that make up the sides of the cooler.
Now measure the height of the cooler and figure out how many slats you need – in my case it was 6 slats for each side for a total of 12 slats.
You’ll want enough slats to cover the entire height of the cooler plus an extra 4 to 5 inches.
Cut those slats to size using the Ultra Saw then place two legs on the ground.
Here’s a little tip: look at how the legs are positioned on the ground and make sure they’re all oriented in the same fashion. This is a small aesthetic preference but will affect the look of the cooler once it’s finished.
Apply wood glue to the legs, position the slats between the legs, pre-drill two holes on each side of the slats, and screw the slats to the legs.
Since my slats were 5/8 inches thick I used 1 1/4 screws so that the screws wouldn’t protrude through the face of the slats.
I initially used 1 5/8 inch screws but that didn’t work out so well!!! The ends of the screws went through the slat faces. I want people to get a beer from the cooler NOT TETANUS.
Do the same thing to build the other side of the cooler.
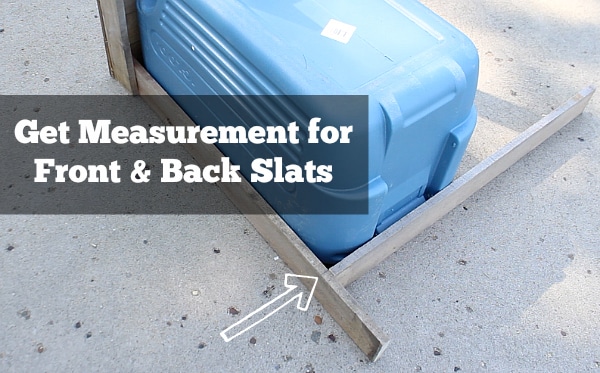
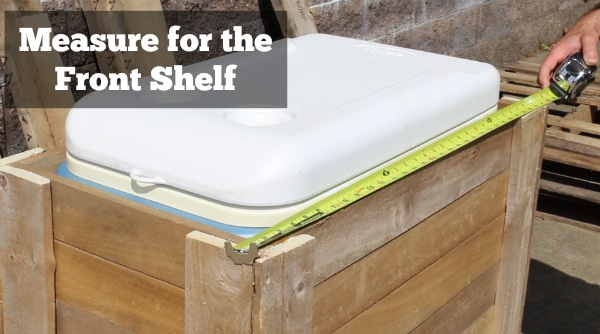
Place the cooler upside down on a flat surface. Position one side flush against the cooler. Place a slat flush with the front of the cooler and against the side piece. Place a second slat flush with the other side of the cooler. Mark the intersection between the front slat and second slat. This is the measurement for the front and back slats.
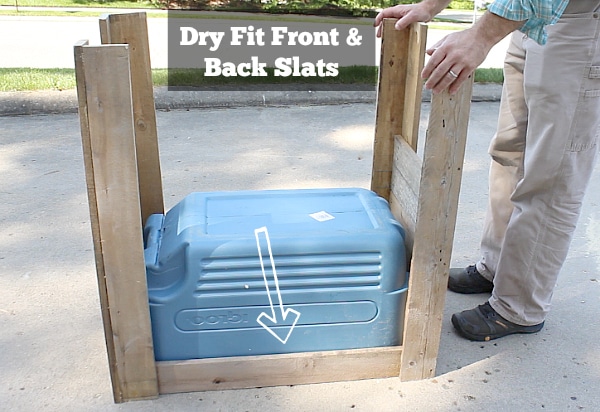
Cut one front slat to size and dry fit it between the two sides to check the cooler will fit.
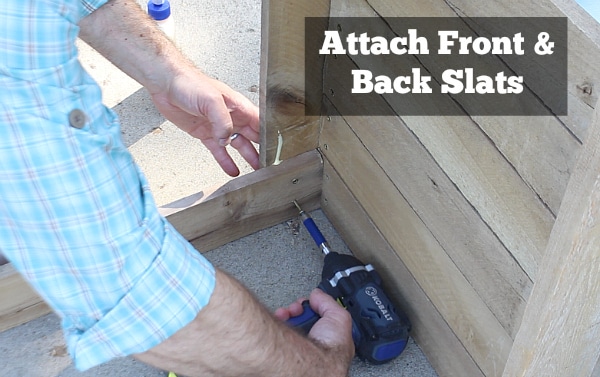
Once you’re sure the front slat measurement is accurate go ahead and cut 12 slats, 6 for the front and 6 for the back.
Attach 6 slats one on top of the other to the left and right sides. Add wood glue, pre-drill two holes on each side of the slats and screw them to the legs just like you did with the sides.
When you’re done you’ll have the rustic cooler frame. Dry fit the cooler into the frame. It will be nice and snug.
The next step is to build a little shelf for the top of the cooler frame.
Making the Shelf and Lid
Keep the cooler in the rustic frame and place the frame on a flat surface right side up.
You’re gonna build a little shelf on top of the frame so that the lid closes easily and the frame looks a bit nicer.
This is super easy.
Measure the distance between the outside edges of the front legs. Cut a slat to this size.
Do the same thing for the back legs.
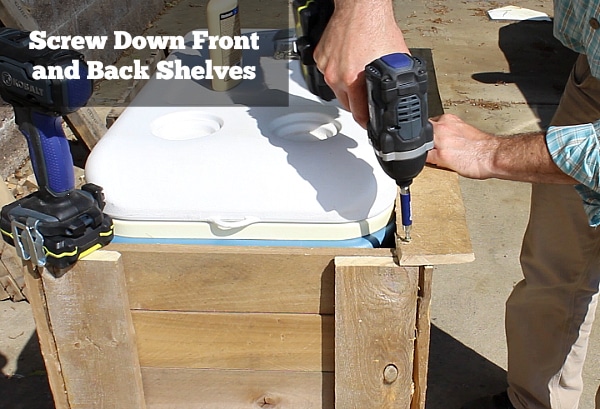
Add glue to the top ledge. Place the front and back slats onto the top of the frame. Pre-drill holes into the slats and screw them down.
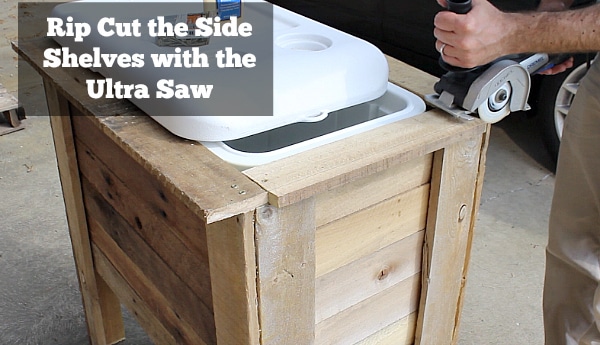
Measure the distance between the front and back slats. This will give you the measurement for the side portions of shelf. Cut those slats to size and attach them to the cooler frame like you did in the previous step.
I wanted the side shelf pieces to be slightly skinnier than the front and back. So I made a rip cut using the Ultra Saw. It worked out beautifully.
With the shelf in place, you can frame the lid.
I placed the cooler lid on top of the cooler and basically built a box around it.
To see how I did this and gave the rustic cooler adjustable legs watch my video tutorial.
I’m super stoked about the legs since our patio isn’t exactly level. It’s a small detail that other rustic coolers didn’t have and I thought it’d be a sweet option. Plus I added a few other cool accessories.
What’s Next
Our tutorial showing how to build a DIY gel fire pit is also awesome – and easy!
If you’re doing a bathroom remodel and need help, join one of our online courses – they’ll make your bathroom renovation much easier!
Let me know if you have any questions and I’ll do my best to help.
Thanks as always for reading, watching, and being part of our awesome community.
Cheers,
Jeff

Rustic Cooler from Pallet Wood
Good work Jeff! The cooler looks really nice and the video tutorial was great. Keep up the good work. I’ll let you know how my pallet project turns out:)
Thanks buddy, I’m stoked to see your wine rack. After seeing your table I bet it’ll look super fantastic!!!
This is a great project for Father’s Day – and perfect for a novice woodworker!
I’m in the process of adding window trim inside and out and this tool looks like it is a lot less cumbersome than the standard ones.
You’re right Cindy, this saw more so than any other is easy to use. I love my circular saw but it can be clunky in tight situations. I think you’d love the Ultra Saw.
You say Rustic, I say Adorable!! Perfect for my backyard and I can stain it to match deck
Thanks Janet. Since I’m a guy I reserve adorable for the kids, LOL.
It did turn out way better than I thought. You can totally do this yourself, I have no doubt.
I love your common sense approach to home repairs and building cool “stuff”! I am in a quandary about a 45 year old Silver Maple tree that we built the deck around 18 years ago. The tree grew! Can you imagine that! Now the deck is touching it. I know from experience that you don’t want dead wood touching live wood because the live wood wins in the end! I need to do something QUICK to remedy the situation! Thanks for your great ideas! M
Thanks Mary Anne. I’ve seen decks like your’s and think they’re beautiful. But yah, in the long run it can be a problem.
Wish I had an easy solution. Is there any way the deck can be “trimmed” back? Kinda weird to ask that questions but it’s what came to mind first.
I’d love this little sander to help me make a sandbox lid for my little girls wooden sandbox we’ve built in our backyard pleeeeease Jeff :0)
I’m also keen to have a go at the cool cooler – maybe the landscapers fitting the pool next door may have some spare pallets for me!
Two great projects for the summer Beckie.
Ask the landscaper and I bet he’ll be able to help you out. Or at least point you in the right direction.
Too bad the landscaper isn’t building you a pool!!!
Thanks for the tip on where to get free pallets. I’ve seen lots of pallet projects on various DIY & gardening blogs and, of course, there are a couple projects on my mental to-do list so I’m gonna round up a list of landscapers’ #s and try to get me some freebies. I’ve been wanting to use pallets to build a potting bench and compost bins. But actually your cooler project has given me the idea to make a potting cooler! Yep! Build a similar cooler with storage underneath and shelves elevated above the lid and use the lid as a work surface. In addition to the bottle opener and cap catcher, I could affix hooks for garden tools. Then after the yardwork and gardening has been done, lift the lid and reach in for some Saint Arnolds Weedwacker, sit back and enjoy. Sounds good, doesn’t it?
You paint a good picture Joe. I particularly like the sitting back and enjoying part.
I think you just came up with a truly original idea of making a potting cooler. Eat your heart out Martha Stewart 🙂
good looking project Jeff. I love my SawMax (my assumption – the prototype of for now upgraded UtraMax) – It makes notch-cutting and cut-outs in general a breeze. I just find myself reaching for it over and over… love it! cheers amigo. ~jb
Thanks buddy, you’re right about the rip cutting and agility of the Ultra Max. It’s less intimidating than the circular saw but just as effective. You gotta come to the Burgh so that I can buy you beer, LOL.
What a great project and versatile tool you used. Your method of plumbing was simplified over other designed I’ve seen. Power washing the pallets was the best tip for me though.
Thank you Jeff,
Mike
Fantastic Mike, yah the power washing made a tremendous difference. The pallets were a mess after sitting in the landscape supply yard.
But they cleaned up super nice.
I was a bit worried about the plumbing but it worked out. Honestyly, I think I got lucky, haha.
Coolest thing ever to make with pallets…and totally free! This is the project for next weekend.
Awesome Alan, let me know if you have any questions along the way.
Especially when it comes to which beer to buy 😉
2 Projects, both for the bedroom. I need another closet in the room & I’d also like a daybed (since you can’t find one bigger than a twin, it’ll have to be built).
Thanks
I like your daybed idea Aimee.
What size are you shooting for?
Of course you can’t lose with more closet space. You might want to make shoe storage while you’re at it 🙂
Jeff where did you get the bottle opener and cap catcher
Could have used that saw on my raised garden beds!!!!
Oh my word, yah it would have come in handy Jeff.
Do you need to make more beds or are you done for the season?
Well that was a cool thing to do! And pretty easy, I might have to purchase Dremel Ultra Saw just for me and make this for my dad :-). Also, I’m glad I watched the video, I was going to ask what did you do about the drainage. Thanks for the idea
Your Dad would love it Teresa.
When you make the cooler let me know if you have any questions. I’d love to help you out.
I’d love to have that saw! I have a perfect space for a small garden bench.
Thanks Marly, what kind of garden do you have?
My neighbors made a cool enclosed garden with raised beds. I love it.
Great idea!
Thanks Roxanna.
Would you consider doing this yourself?
Hi Jeff,
Nothing short of FANTASTIC! This will need to be an early spring project as summer is HERE and so much in the garden to do now.
About the giveaway:
Am trying to teach grandsons use of tools for building small projects, help me do repairs, create some lawn sculptures using their own creativity. No one else is teaching them any of these things. So far limited as the large saw is just too much for them, and sometimes even for myself. For this reason many things have not been accomplished. This size would be so perfect!
Many of my rooms are still without moldings–NEED this tool so I can do it myself.
Along with so many other ”needs” around here.
Yep, this tool would be unbelievably helpful in so many ways, that trying to list them all would keep me writing for far too long.
Thank you for all your ideas and the way clear way you present them, definitely pure help.
char
Sounds like you’re a great teacher Char.
I’m a life-long learner and can appreciate the need for passing along knowledge.
How old is your grandson?
What a great project, it turned out so well (I attribute that to the beer; incentive is everything!).
I have not come across the Dremel Ultra Saw before, it seems like a super-versatile tool – hope I win 🙂 – I want to replace the door trim & baseboard at our vacation home, as it is in poor condition. This looks like the ideal tool for that job!
-Anne
LOL, you’re on to something Anne. Beer is a HUGE incentive.
Yep, trim and baseboard work is perfect work for the Ultra Saw. You can use a rafter square and be done with it in no time.
I have seen this before but so far have not seen a tutorial for it. T hanks so much for posting this tutorial. My husband says that pallets contain some nasty chemicals. Do you feel this to be true? If so what are the options for cleaning them to a point where a cooler can be built safely from a pallet?
I’ve read about that Patricia and saw a great article over on Funky Junk Donna’s site.
Here’s the link to her post
http://www.funkyjunkinteriors.net/2011/04/all-you-ever-wanted-to-know-about.html
Fortunately the pallet wood won’t touch the inside of the Igloo cooler. So I’m not concerned about my beer getting contaminated 🙂
I bought some 1x4x8 boards from Home Depot for $2.04 each. I’m in Canada and I imagine those are much cheaper in the US. The boards are very similar in size to pallets but you don’t have to worry about the wood treatment.
What an awesome giveaway for Father’s Day! My husband would LOVE this! He’s always working on some kind of project with wood. He built a huge wooden shelf in our garage for lots of storage. He built a work bench and various other little projects. He is currently working on his 38 year old GM van. Pretty much gutting it out, to spruce it up. That’s his baby! From what I can see, that saw can also cut metal?!? He will be needing to cut some metal for the van too. At any rate, he would have multiple uses for that saw and would absolutely LOVE it!!! I hope I can win it for him!
Not only is your husband handy, he’s a mechanic!!!
Now that’s a guy’s guy Diane.
My Dad had an old Dodge van and he added a third row of seating using a love seat. Yah, not exactly safe but it worked, lol.
Tell your husband that I said hello and keep up the great work 🙂
We need to rebuild the frame on a door & fix up some old bookshelves. This sure would help!
This saw is totally made for both of those projects Laurie.
What kind of books are on those shelves? Any Hunger Games or more classic Catch-22 stuff?
The project I will be doing is creating a pet bed from either an end table with doors or a vintage console TV if I can every find one 🙂 I’m just starting out and enjoy creating things from thrift store, Habitat for Humanity and curb side finds. This saw would be a great help as I always ask the guys at the big box store to cut for me 😉 Thanks & I really enjoy your blog & have learned a lot from your posts.
Linda Mayer
Love your use of thrifty finds Linda. I gotta admit that I should do that more often. As I drive around on garbage day I try to spot stuff for future projects.
Thanks for dropping in 🙂
Hi Jeff – I bought a fixer upper a year ago so many projects could benefit from this saw! Love your blog. The next major project is my kitchen which is almost non-existent at this point in time!
Thanks Carla, are you able to salvage any of the cabinets in the kitchen? Maybe paint them or add some accessories.
I am in the middle of building a “house” for an extra large water storage tank. We live in the country and have frequent power outages; and when the power is out, the well is out! So we purchased an old 500 gallon tank (Note: if purchasing one for water storage make sure it is “food grade” and not previously used for chemicals). I want to lift the tank off the ground, build insulated housing around it, and be ready for the next power outage! It won’t be warm water but it will be wet water which beats NO water any day of the week!
I love your site and your tips and instructions are great!
Thanks Michael, you’re the real deal. That’s not an easy project.
Do you have issues with the water freezing, too?
Getting ready to make railings and lattice dividers for deck Boy! Would this make things easier! Loved your demonstration… .
You’ve got a great project on your hands Mary Lou.
The Ultra Saw would rip through the dividers and rails no problem.
Would love to win this tool !! Since I’m only 110 lbs. soaking wet, this smaller tool looks right up my alley. Two projects coming up. Believe it or not, this was one of them so now am just ready to get started, found an old ice chest two weeks ago buried in my sisters shed. Second one is a compost bin. Bought one from the hardware store about 5 years ago, thank you tornado for spreading it throughout the neighborhood. Time to build one out of heavier material, already have landscape timbers & leftover fencing, along with my stack of leftover lumber. All that’s left now is to win this new Dremel Ultra Saw to help me out 🙂
You could maneuver the Ultra Saw no problem Rebecca, it has heft to it but isn’t all that heavy. So it’s perfect for someone like you 🙂
Darn tornados, what the heck do they need with compost bins?
Good use of using timbers and leftover fencing for this project
I always read about your projects. My husband and I have done a lot of projects together; but I figure we can always learn more tips. We plan on refinishing our basement. I don’t know if this saw is appropriate; but it never hurt to have one more tool. Thanks for sharing.
I appreciate you always coming to HRT Liliana. It’s so cool that you and your husband do projects together.
The Ultra Saw would certainly help with the basement. Are you gonna make it into a family space or have other plans?
Forgot to say that my Daddy has been gone for 8 years now or would be giving (If chosen) the winning Dremel saw to the most important, smartest man I ever knew. He taught me everything I know & where to look to learn more. Husband passed 12 years ago so that leaves me as Mom & Dad too. Get to celebrate both because we raised such awesome kids!! So Happy Fathers Day to all you wonderful Dad’s AND Momdad’s out there!!
Thanks Rebecca, your memories will live on through your kids. Sounds like they got a lot of the great qualities of your Husband and you.
I bet your Dad is proud of you for being a great daughter, wife, and mom 🙂
Looks superb Jeff! If I had a place to store a cooler this size, I’d be all over this project.
I’ve got a few projects on the old “to do” list but not having a circular saw (and my father in law taking his back to Texas) stopped me from working on. An above-the-door shelf/cabinet for bedding & linens; and a riser for a filing cabinet with a floor-flush drawer (on carpet… not fun. HA!).
As always, thanks for the awesome tutorial, and the cool giveaway to enter!
You’ve got a ton of project to do, whoo eee!!
I’m sure your wife wouldn’t mind the cooler in the living room, I mean it’s furniture. LOL
Thanks for dropping in buddy 🙂
Would give the saw to my brother, who was ‘Dad’ to my brothers and to my foster sons, who were FASD and developmentally delayed. He never faltered or complained through very difficult times. And he could use the saw- building furniture, like he has done throughout our house- doing the woodwork in the tin boxes he is refitting for our living space- for the woodshed he is currently planning from used wood-for the kitchen cabinets/island he is doing. The list is endless. Did I forget to mention that he also makes picture frames? Or that he makes/repairs all kinds of things for people who cannot afford to hire ‘professionals’? And does a better job, too!Happy Father’s Day to all those men who have taught boys and girls what a real man is!
Your brother is a great guy Dian. What a wonderful example for the kids.
Having someone be so giving and helpful is an inspiration to all of us.
The things I would tackle if I won the ultra saw would be…..hum were to start? Well, I would like to fix the boards on my fence line. Tackle on the job of making a post it cube for my post-it pads. Definitely, would love to complete the project of framing my mirrors in the bathrooms. I would definitely tackle some of those projects that “Shanty 2 Chic” has listed on her site. Some Ana White Projects too. Oh the list is endless……floating shelves, coat rack, a bottle opener or some cedar planter boxes. The best part would be to have the hubby help.
I know Elena, there are a ton great projects out there. The ladies at Shanty 2 Chic do awesome stuff. Very inspiring.
Floating shelves are what I’d like to do myself in the basement.
Which project would you do first?
Really enjoy your website and the e-mails on how to do things. Keep them coming.
Thanks Dennis, what kind of project are you working on? I’m sure you have a list like me, lol.
Jeff, love this project idea, I’ll have to add it to the list soon since the Arizona summers have heated up early. I sure could use that Dremmel saw to build garage overhead storage to get our holiday decoration containers off the floor so I can expand my project work area. My wife also wants me to build under-sink slide outs in our bathroom and the saw would help tremendously on that project. Right now I have a circular saw, chop saw and some hand saws which are good but not as convenient and effective as the Dremmel saw.
I don’t know how you DIY in the heat out there Boz. You and my buddy John both somehow manage to get stuff done in 100F plus heat.
Loving the slide out idea in the bathroom vanity. That’s exactly what I need right now.
It’s a dry heat, right Boz? (Just like an oven). Nice to see another desert DIY’er. I gotta get outside this morning while it’s still “cool”.
Jeff, I’ll be sure to send details and pics on the vanity slide-outs. I’ve seen some ideas on other sites, just not exactly what she wants.
My Dad would love to have the Ultra Saw! He’s in his 80’s and still loves to build. He’s limited to smaller projects these days and so the Ultra Saw would do the job for all his upcoming projects-including building my pull out shelves for my kitchen cabinets!
Thanks for the great cooler project.
Whoa, now that’s longevity in action. I hope to be DIYing in my 80s, too.
Pull out shelves are great for kitchens. You’ll love them.
The Ultra Saw would be wonderful for building the dog house. I envision it to be up off the ground a bit, with a porch and a low slanted roof that can be lifted to allow air flow in the summer. I’ve found several plans online but want to change them around a bit. Thanks for the great give away.
You have one lucky dog Mary.
I love the idea of a removable roof, how neat is that!!!
Keep me updated on your project, are you gonna do it this summer?
Yes, we have the wood already that we have saved from different projects. We just have to do it. You are an inspiration for all of us do-it-yourselfers.
You’re too sweet Mary. Thanks so much.
Please keep me posted on your project. I’d love to see it 🙂
My husband would like to make herb and veggie boxes out of some pallets and stand them up attached to our fence. We have a mole problem in our yard and cannot plant a garden.
Those darn moles, they are a pain in the butt.
We have them too Carol and they get into more stuff!!!
What kind of herbs and veggies do you grow?
Great tutorial Jeff!! I’m adding this one to my list of things to build! It looks super sweet and it’s just my style. I’m not telling my wife about it though: I’ll surprise her with it when it’s done.
But that Dremel Ultra Saw would be a great addition to my toolbox, especially since we are going to buy my dad’s 1908 Queen Anne style house and give it a major remodel. It’s gonna be a loong process but the first thing that’s gotta be done is a complete kitchen gut and makeover. We’re excited and scared all at the same time! lol
Kitchen remodel – now that’s fun. Seriously, I know it will be a lot of work but the final result is so satisfying.
Make sure you send me some pics Mark. I love seeing older houses be transformed.
Are you going to move from your house to your Dad’s?
um, pretty much every project in my house. going to build a dining room table next, this could really come in handy
I like the dining room table project Jenny.
My buddy Joe built a table from old barn wood and it looks unbelievably awesome. I bet you could do the same thing.
Are you looking to do this project pretty quickly?
Hi Jeff,
My wife wants me to build her several raised garden beds and the price of pallet wood really appeals to me; and the thought of a saw that handles nails without knocking the carbide tips off of the teeth sounds like a dream come true! It looks like I’ll have to win this or beg for one for Fathers’ Day!
Thanks, and keep up the good work,
Mark
I love raised garden beds Mark, they look fantastic.
You’re right about the price of pallet would: it’s perfect for us penny pinchers, lol.
Happy Father’s Day my friend.
I’m going to replace some boards in my fence and this tool will be perfect for trimming the material to match the existing pattern. I can see from your cooler project that this saw is really handy for those jobs where small size but high performance counts!
You spot on Charles, this saw is super nimble in tight spaces. It’s easy to just grab and go.
Your fence project would be a lot easier.
Did your boards rot?
I have a feeling my husband could make quite a few projects with this saw. I really want a new outdoor table (custom made by him of course) with a planter cut out in the middle. I think this would help!
I like that planter idea in the middle of the table Kristina. That’s way cool.
You could easily cut out the space using the Ultra Saw.
What’s your timeframe for the table, this summer?
Ooooh, I could use one of these Dremel Ultra saws! I cannot cough up the exorbitant cost of those wooden square planters that I see everywhere, and could use this saw and some pallets to make one 🙂
That’s a great idea Laurie, those planters are crazy expensive.
How many do you need?
Very cool looking cooler! I would love to make one for all our summer outdoor parties.
Love your site, I always learn so much.
Outdoor parties in the summer are the best Lidia. Family, friends, and some fun. It doesn’t get any better.
Thanks for always dropping in.
Are you working on any home projects as we speak?
I would love to win the saw. I am a beginner DIY er and it would be perfect!
Thanks Kathy, what kind of projects are you embarking on these days?
What a great project! I bet you could make some bucks selling those, especially if you included a starter selection of frosty beverages.
I’m curious about that saw. It looks like there is a variety in the blades. What are the diferent types?
You’re right John, there are a few different blades. One for making standard wood cuts, another for flush cuts (thing door trim), one for grinding mortar or thinset, and another for cutting metal.
I wish I had this when I had to remove a tile a few weeks back. Dang it!!
A starter kit of lager or IPA would be a fantastic idea. My only fear is that no work would get done, lol.
Love this!!! My husband has been looking for plans. This is perfect!!!
If he wants to try this out and has any questions let me know Jill. I’d be happy to help with any details.
Sometimes it’s nice to have someone answer questions while you’re doing a project 🙂
That is going to look so great with my other projects. I put up 3 pallet planters with a vertical garden of strawberries. I cleaned them, added a board in the middle and on one end to split up the areas with dirt. Then I drilled through the interior boards and strung through a drip system and painted it a creamy yellow. To hold the dirt in I used heavy duty gray felt from the craft store and screwed that on with big fat washers holding it in place. After planting the first time horizontally, when I hung the planters I planted the top row with bright castle mix. They look awesome in my small San Diego yard, give off tons of strawberries, and provide green the rest of the year. I give them as gifts to friends when they get a new home and they love them.
I would love to win the dremel saw because in April, my garage was broken into and over $1000 of my tools were taken (ie all the power tools). Most of these tools were hand me downs from my father and grandpa, so the loss was doubly keen. This Dremel saw looks perfect for a whole bunch of pallet projects, including 4 more pallet gardens friends have requested, including an inside one with succulents. And I didn’t get to put a top sill on my raised planter bed before the theft so it would help finish that off. My next wish is for you to do a pallet coffee table tutorial!
Keep the DIY projects coming. I love watching each and every one of them (especially the garage ceiling storage racks, which I need but haven’t had time to build yet).
Thanks,
Annie
Thanks Annie for your story and that stinks about the theft of all your tools. It’s no surprise that there are some bad people out there but can’t they just keep to themselves?
Your pallet project sweet, especially since strawberries grow from it. If you have time send me some pics, I’d love to see your vertical garden.
You’re such a nice person to make these for friends 🙂
Jeff,
What a fun project. I think I need a rustic cooler at the lake for the Amber Bach.
I have an iron bench with old, rotted slats. I’ll bet that nifty dremel saw would help me repair the bench!
Thanks for your always helpful videos.
Amber Bach, now we’re talking!!
Thanks Linda for being a super Fan of HRT, you’re awesome.
I bet the saw would make short order of your bench repair.
I’m wanting to build a wood framed stand and cabinet for an old Hibachi Grill I’m fixing up.
Now that sounds cool Isaac.
What’s your favorite thing to grill?
That’s cool…and you use recycled wood. I need to make a door for my attic and I could sure use that little saw.
Are you going to make the door from pallet wood Darlene?
I have found that looking on Craigs List, or Free Cycle.Org, there are lots of free pallets. I have gotten a few so far with hopes of making a coffee table & end tables.
Great suggestion Donna. I love Craigslist. It reminds me of the 90s in terms of its styling but darn if it doesn’t have fabulous stuff on it.
Are you gonna make the tables this summer?
great patio cooler jeff. I don’t need one of those but I could sure use the saw for my tool arsenal. right now I could use it to trim the ends of some of my laminate flooring I put in last summer. a few are buckling and it must be because I didn’t give them quite enough room for expansion. keep up the good work.
For some reason I didn’t even think of using it for laminate. But it’d be worth a shot.
I put in bamboo laminate a few years back and it still looks great. Love that kinda flooring.
Keep me posted on your project Dennis 😉
Great post. Our deck needs some work in places and this would be handy for that, I think. I am also planning to build a pergola to attach to our deck to try and help with the brutal Texas heat. That is, my dad will be building it with me as his helper. 🙂
You’ve got some great projects Kim. And there’s nothing like a father and daughter working together 😉
I’m dying to try and build a coffee table out of pallets that I saw on Pinterest. I have one small round end table in my living room and an ottoman which are covered in our have to have out stuff. The coffee table would double as storage and as a coffee table! We have no saw tool at all! Would love to give my husband this saw for Fathers Day!!!
Thanks Colleen, pallet wood would be perfect for your situation. It’s free and can look awesome.
I love the storage idea behind the coffee table. Who doesn’t need more storage?
Jeff,
I’m planning on giving this a shot. With some slight mods to your instructions, this cooler box could very easily be used for a rustic planter. Instead of using a cooler, you could use a plastic tote with holes drilled in the bottom. Having a similar looking planter box on either side of the cooler could look really sharp.
Adam
Oh man, I love that idea Adam.
Let me know when you do it and send in some pics. I’m actually thinking of doing another project where I build a bench that also serves as storage for seat cushions.
There are so many exciting options.
Btw, looks like you’re a Pitt Alum – Hail to Pitt!!
🙂
i think this is cool will have to make one but first have to do my green house out of pallets and then i have to make my blueberry thing so the dam squirrels will quit steeling them
Darn squirrels!!!
I like your greenhouse idea. Keep me updated on your progress Danielle.
I will create this… I will! FOR NARNIA!!!
Lol, classic. Thanks buddy 🙂
If you go to a hardware store, such as ACE, True Value etc.., instead of the big box stores, you can buy the screws by the pound cheaper than by the box.
Thanks David for your tip 🙂
Hey Jeff,
I know this is a pretty dumb question, but how exactly is the cooler supported within the structure. I did not see any supports holding it up. Any clarification? Thanks
Thanks Evan for your question. I showed it really quick in the video but there are 2 wood supports underneath the cooler that keep it nice and secure. Yah, that’s pretty important to have supports.
Nobody wants spilled beer!!!! LOL.
Love this idea and the simplicity of making it. Looks like a project for the deck at the lake. Looks like another project for the me and my hubby. One tiny change I’d make is to put the opener over the catcher so you can be all efficient and open your beverages with one hand!
What size was the PVC Coupling?
I asked for an Ultra Saw for Christmas after reading this post. To my delight, I found one under the tree on Christmas morning. I’m excited to make myself one of these rustic coolers!
That’s awesome Matt, the Ultra Saw is a great tool for many different projects. Congrats buddy!!! Let me know if you have any questions
I love this idea. I am going to be building one soon and my biggest questions is how do you get the water (melted ice) out of the cooler? Do you have a hole cut where the normal drain on the cooler is so you can drain it out or do you get a buddy to help you lift and dump the entire cooler?
I let the ice melt and drain through the custom drain that was installed on the side Matt. Let me know if you have questions on that part since it was a little tricky.
Thanks for the great project idea and excellent instructions, Jeff! My pallets were in pretty rough shape, as are my carpentry skills, but it turned out fine.
Sweet, thanks March. Send me some pics, I’d love to see the cooler.
[email protected]
Great article. You say Rustic, I say Arrestic!! Perfect for my lawn. Thanks
Jeff, glad you had this site. I’m learning a lot from you just watching how you handle tools: I am looking to finish one large table/island, (well, large for Me) and watching how you use tools is very handy. But let me ask you this, Batman, what product would you use to stain, and pre-condition if necessary? I think I want to go with like a medium wood tone, but I might change up on that. Just poly after staining? or condition? Thanks, no rush, but thanks in advance.
This is so damn cool I made like 25 of these, one for all my b*tches
Hi,
What holds the bottom of the cooler in place?
How is the cooler supported in the bottom?
The slats were 3 1/2. Wide or 5 1/2 by 5/8x 33.
Looks good and super easy. But am I missing something? Shouldn’t there also be a frame on bottom of cooler to keep it up? I know there will be lots of weight with beer and ice. Just a thought. I will be doing that. Keep up the good work and thanks for taking the time for posting this
Way cool project! Showed a few family members now I have to build 3 of them!
Thanks bro, definitely a YouTube follow!
Thanks George, appreciate it
Working on the pallet cooler now as a surprise for my wife!! Thanks for the video and plans!!
Thanks Jeff,
I used your ideas and built one as a Christmas gift. What a great idea that turned out really well. She was pleased.
Cheers,
Tim
I’m a little confused, what supports the weight of the cooler?
Thanks for your help
You explain every thing real good except the drain part. What do you use to extend the drain. I have seen several different ways but no one say how to get the pipe to be the exact length to put the drain on. The pipe on cooler is different treads from pipe treads. I would apricate any help you can give me,
Love this idea.. and the process you told.. me and my husband really enjoyed alot.. going to copy you 🙂
How did you support the cooler’s weight bud? I can make up something, but curious as to how you navigated that.
Thank you-