How do you replace old copper pipes and fittings without soldering?
More importantly, can you do this without having a ton of money, time, or plumbing experience?
These questions came to me after noticing an old corroding copper shut-off valve in our basement ceiling. In the past, I’ve paid plumbers $90 to $160 to replace one-foot sections of copper pipe.
You can easily repair copper pipes and shutoff valves with the greatest plumbing supply ever: SharkBite push-fit pipe connectors.
I’ve used SharkBite products in several rental homes, as well as my own house, with no issues. A beginner at plumbing can use SharkBite pipe connectors and can eliminate the use of a plumbing contractor for basic repairs. I love my plumbers but if I can save a little money for my daughter’s college fund then I’m gonna do it.
If you know how to use a measuring tape, sharpie marker, and copper pipe cutter you can do this project.
Getting Started with Replacing Copper Pipes
Here are the supplies you’ll need:
- SharkBite shutoff valve
- SharkBite Slip End Fitting
- AutoCut copper pipe cutter
- Sharpie marker
- Measuring tape
- Extra copper pipe
- These Amazon affiliate links help support HRT…muchos gracias
I guarantee this is an easy task and you’ll be super happy with the results. If you don’t have time to do anything else you should watch the video because it shows you just how easy SharkBite fittings are to use.
Let’s dive in.
Removing the Old Shutoff Valve, Pipes & Fittings
First, shutoff the water to the house at the water main. Then drain the water from the lowest point.
I drain water from the pipes by turning on the water in the laundry tub. You’ll only need to do this for the cold water if the pipe you’re working on supplies the exterior of your home.
Grab a container that can collect the excess water coming from the pipe being cut.
SharkBite fittings need 1 inch of pipe to make a good connection. Keep this in mind when cutting out the old pipes and fittings.
The old corroded shutoff valve that needed to be replaced was in our basement ceiling between two joists. Even though I only needed 1 inch for the new SharkBite valve I measured 1 1/2 inches away from the joist to give some extra cushion. You can make a mark with a sharpie to indicate where you’d like to cut the copper pipe.
Use the AutoCut copper tubing cutter to make the first cut in the old copper pipe.
I LOVE this tool because all you need to do is snap it onto the old pipe, close the gate, and rotate until the cut is complete.
Water will drain from the first cut in the old pipe. Collect it in a small container.
Now it’s time to measure where the second cut needs to go.
In order to connect the new SharkBite shutoff valve to the old copper pipe, use a SharkBite Slip End fitting. This pipe connector is different than a traditional SharkBite. Slide the copper pipe into it by up to 3 inches. This is super useful when you need to replace pipes and connectors in the middle of a copper line run.
In my case, the old shutoff valve was sandwiched between two joists. I measured 1 1/2 inches away from the joist for the first cut.
For the second cut, I measured and made a mark 3 1/2 inches away from the second joist just left of the old valve. This ensured there would be plenty of room for the Slip End fitting.
Cut the copper pipe at this second mark using the AutoCut tool.
With the old shutoff valve and pipe removed, it’s time to use the SharkBites!!!
Using the Greatest Plumbing Supply Ever: SharkBite Push-Fit Pipe Connectors
Spot the end of the first cut you made and measure in 1 inch.
Make a mark with the sharpie.
Push the SharkBite shutoff valve onto the copper pipe until it fits snug and flush with the 1-inch sharpie mark.
These same shutoff valves can be used for shower mixing valves.
BAM!! You connected a shutoff valve in less than 1 minute.
The valve will rotate freely so don’t be alarmed or concerned that it isn’t properly installed.
Now it’s time to push on the Slip End fitting.
Look at the second cut you made in the copper pipe and measure in 1 inch.
Again, make a mark with the sharpie.
Push the Slip End fitting onto the copper pipe until it meets up with the sharpie mark.
Now measure the distance between the Slip End fitting and the shutoff valve. Add 2 inches to this measurement. This is the total length of copper pipe you need.
Watch this video to see just how easy this entire process is for even the very beginner (and no this isn’t a typo).
All of the supplies I used are for 1/2 inch copper pipe.
My plumber recommends using Type L copper because it has a thicker wall than Type M. You can see the type by looking on the side of the copper pipe.
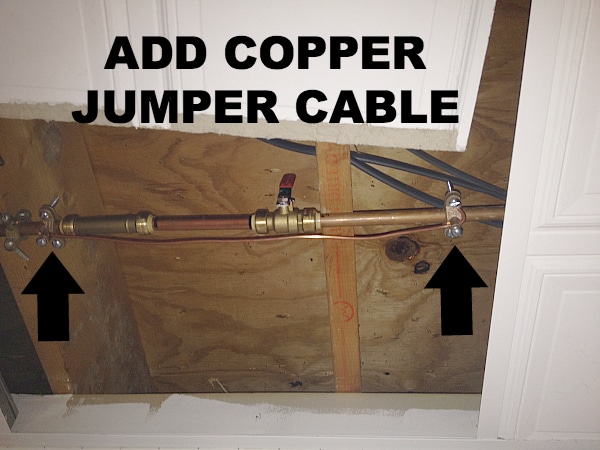
One of our fans pointed something out: if your pipes are properly grounded the SharkBite will break that grounding effect.
You’ll have to add a copper jumper cable.
Attach the jumper cable to the copper pipes on the left and the right of the SharkBite fitting with clamps to ensure the pipe is re-grounded. Thanks, Scott for pointing this out!!!
What’s Next
SharkBites are awesome, especially if you have to fix a pinhole leak in a copper pipe.
If you’re doing a bathroom remodel and need help, join one of our online courses – they’ll make your bathroom renovation much easier!
Let me know if you have any questions and I’ll do my best to help.
Cheers,
Jeff


