Nrdly
Get Nrdly Free Trial Built with Nrdly

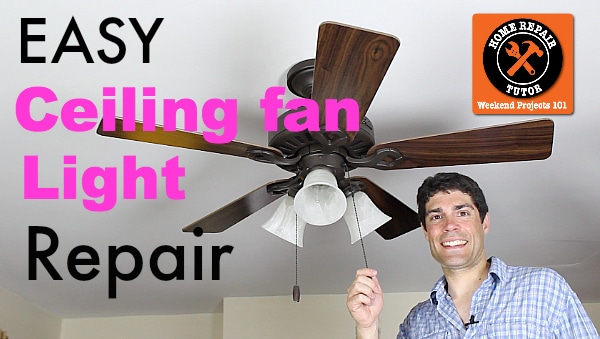
Ceiling Fan Light Repair

Do you like saving money? Of course you do, right!!!

A few weeks back my awesome tenant called to say her ceiling fan light wasn’t working.

At the time I was way too busy to fix it and tried calling my electrician. Turns out he was knee deep in work, which is often the case in July.

After a little investigating I was able to replace the pull chain for a meager $4 but only after making a fatal mistake that cost me $50.

Today you’ll discover how easy ceiling fan light repair can be and how you can save a lot of dinero by DIYing.

And YES, I’ll share my expensive bone-headed blunder.

Unexpected Ceiling Fan Repairs! 

Broken pull chains and ceiling fan repairs, while rare, can still be a costly project if you have to pay someone else.

I’ll show you two different ways to fix your ceiling fan light.

Although the second option was how I lost money.

Here’s your supply list

Here’s what you’ll learn

  • How to do a ceiling fan light repair

At the end of this tutorial you’ll be able to teach someone else how to fix their ceiling fan light 😀

Ceiling Fan Safety Tips

Yah, getting shocked isn’t a hobby I recommend.

Turn the power off to the ceiling fan before you do anything. Do this at the electrical panel or fuse box.
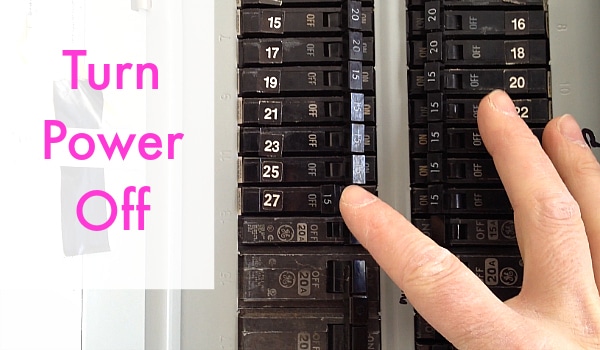
Turn power off

Flip the breaker to off or remove the fuse that controls the electricity of your fan circuit.

Remove all the shades and light bulbs because you’re going to disassemble the light kit from the fan.
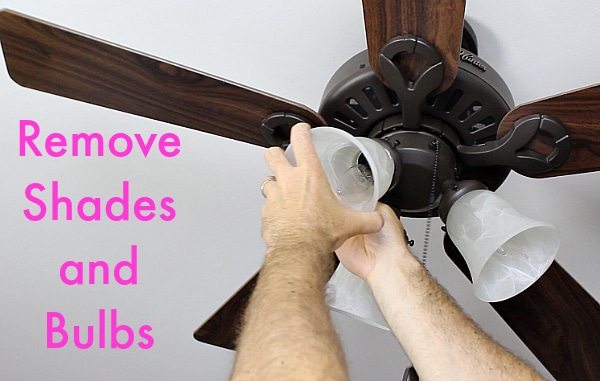
Remove shades and bulbs

The shades will have 3 to 4 set screws. Simply turn them counterclockwise with one hand while holding the shade.

There will be 3 screws holding your light kit to the ceiling fan.

In my case there were 2 screws that needed to be completely removed and 1 slotted screw that only had to be loosened.
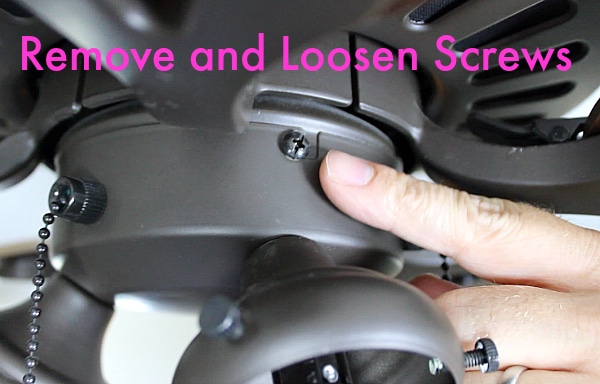
Remove and loosen screws

Turn your light kit slightly to disengage the slotted screw and pull it down from the fan.

Newer fans have light kits plugged directly into the fan. Older fans have hardwired light kits.

Take a picture of your electrical configuration so you’ll know how to reassemble it.
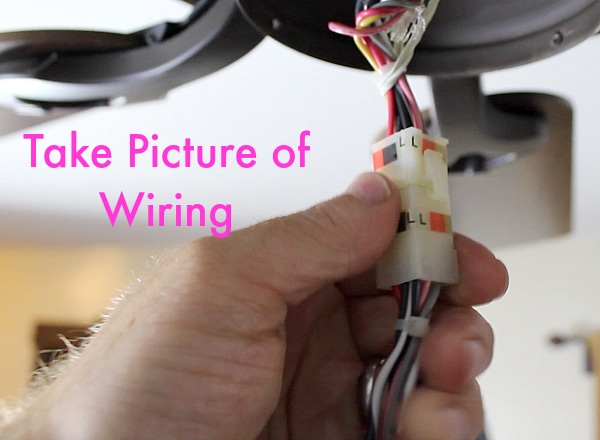
Take picture of wiring

The Hunter fan I’m working on is from 2010. It’s light kit simply plugs into the fan but don’t be scared if you have a hardwired configuration.

Find the wires connecting the light kit to the fan, snap your picture, then unwire the kit.

With the darn light kit down you can replace the pull chain.

Ceiling Fan Light Repair: $4 vs $50 

Don’t be a dummy like me.

I initially assumed my ceiling fan light wasn’t working because there was something wrong with the entire light kit.

Bad assumption.

I ordered the $50 replacement light kit from Hunter before seeing if the pull chain was the culprit.

You can slap me now. Maybe it’ll knock some sense into my thick skull.

Here’s my advice: if your ceiling fan light isn’t working try replacing the pull chain first.
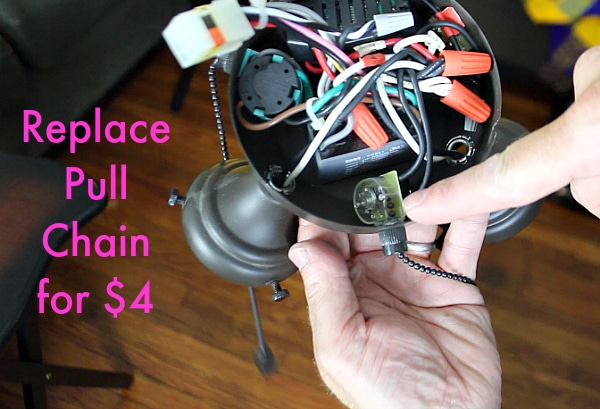
Replace pull chain

It’s hardwired to the light kit. Again, take a picture of the wiring then undo the two wire nuts that wire it to the rest of the light kit.

There’s one nut holding the pull chain to the light kit housing. Turn it counterclockwise to remove the pull chain assembly.

You can buy a $4 pull chain in the lighting section of any hardware store. Make sure it has the correct number of wires that match your ceiling fan’s existing pull chain.

My video tutorial shows you how easy this is. You don’t have to be an electrical wiz to fix your fan. Trust me, I’m no Nikola Tesla.

And that my friend is how you save $90 by doing a ceiling fan light repair.
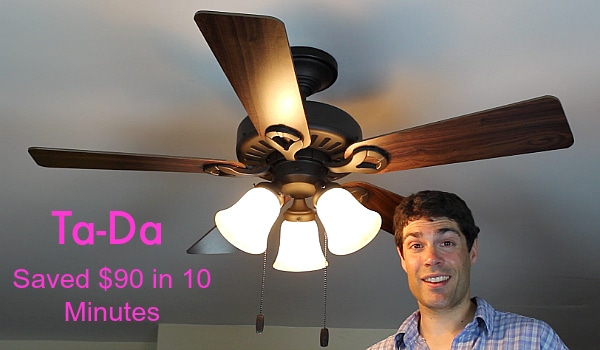
Saved $90

What’s Next

This was a small project that saved me a ton of money. Learning how to patch drywall can also be a great cost savings!

If you’re doing a bathroom remodel and need help, join one of our online courses – they’ll make your bathroom renovation much easier!

Let me know if you have any questions and I’ll do my best to help.

Thanks as always for reading, watching, and being part of our awesome community.

Cheers,

Jeff

Ceiling Fan Light Repair

  1. Jill Patterson says:

    Hi Jeff. I’ve been looking at a problem for awhile and haven’t found a good solution for it yet. The vinyl flooring next to my bathtub needs recaulked but has lifted slightly. I’m not sure how to get it glued back down to caulk. It’s not lifted enough to pull back to get to it. And I’m not wanting to pull the flooring up anymore. If you have any suggestions, they would be greatly appreciated. 🙂

    1. Good question Jill and a common problem.

      Do you think there’s enough space between the lifted floor and the subfloor to apply flooring adhesive?

      Here’s what I’m thinking, you can get flooring adhesive (specifically for vinyl flooring) under the lifted section.

      Cut a strip of wood the length of the lifted section and place it on top of the floor. Then add weight to the wood to press down the floor while the adhesive sets. You could use sand bags, cinderblocks, or have two 10 year kids stand on it for 24 hours (just kidding).

      It might not be a bad idea to spray the wood that’s going to contact the floor with cooking spray so that it doesn’t stick. I’d even place a drop cloth under the wood such that it protects the floor right up to the floor/tub transition.

      Let me know what you think or if this won’t be solution 😉

      1. Joe says:

        How about adding adhesive and then tacking all down with a piece of plastic quarter round or similar.

        1. Joe, that’s a MARVELOUS idea.

          Definitely use plastic quarter round since wood and moisture don’t place nice. You can paint the plastic, too. But I’d leave it plain.

          Great idea!!

  2. mary croix says:

    Thanks Jeff, great instructions!
    Now, what about the fan part? Ours is not working! Just buy a new one?

    Our son at the present time is removing tile from a small shower! I told him about
    you web site. I am sure he will sign up.

    How do I fix my sink stopper so it will stay open. I am using my fingers now.
    Thanks,
    Mary Croix

    1. By the fan part, are you speaking about the other pull chain Mary? If so, you could call and see if that part is available instead of replacing the entire fan. As long as the part is cheap enough I’d go that route.

      Funny thing, I have to remove our shower tile next weekend!! Fun stuff.

      Your sink stopper can be fixed by making sure the pivot rod is in the stopper’s slot. You’ll have to go under the sink and loosen the nut holding the pivot rod to the drain. Then you can slide the rod into the slot of the stopper. Just make sure to tighten the rod’s nut so that it won’t leak water.

      Let me know if you’ve got any questions 🙂

    2. Janele Dyer says:

      What kind of stopper is it? The kind that you pull up on it or push it in to stop up water. If it is the the one you pull up on the small rod that sits on the back of the faucet then you have to go under the sink. There should be a little lever that screws in on the side of the pipe connected to the drain. If the is not one then you need to get on that does other wise a plug is not part of the drain. If there is a small rod lever attacjed to the side of the pipe then you have to unscrew it. Make sure no water is in the sink or to not run water while this is unscrewed because it will all come out of the hole and make a mess. Then go back to the sink and pull up on the plug it should come out easily and see if there is a hole at the end of the plug that goes into the drain. If there is not then it does not go with that sink. If it does put plug into the drain and then put the end of the small rod lever into the side of pipe. You want therod to go through the hole on the plug. Once this is accomplished then screw the rod onto the pipe and there should be a small plastic rod that has small holes along the side of theo rod. Place,the lever that is at the end opposite the end you screwed in to pipe. And attched the,lever through on of the holes that are on the pllastic rod,the test,it to make sure it plugs correctly.

  3. Ginny says:

    Thank you for all your handy home repair tutorials. I recently discovered- or should I say my husband did- that our 8′ sliding glass patio door could be repaired. After fighting with the door daily for the past 10 years, when his disabled brother recently came to visit for 3 weeks and his arms were bloody from trying to open and close the door (he’s a smoker and had to go outside) my husband finally looked into repairing the rail. All it took was a little grinding with the roto-zip and a special piece of metal from Lowe’s to fit over the bad rail, and voila! I can slide it with one finger. We had thought the whole door needed replacement, a minimum $2500 job. The metal piece was only a few dollars. It was the most amazing and appreciated DIY my hubby has ever done.

    1. Love your story Ginny. Sometimes it’s mind boggling how simple a project can be. And all it takes is a little investigating.

      I’ve experienced this so many times myself. Being scared to fix something then realizing it’s not that bad. Keep up the great work and money saving 🙂

  4. Riann says:

    I purchased a replacement light pull chain months ago and kept putting off replacing it because I was afraid it would be difficult and time consuming. Now I know that it’s totally not. Thanks for the great video!

    1. You’re super welcome Riann. Glad to hear your gonna rock this project out.

      Let me know if you have any questions along the way 🙂

  5. Mary O. says:

    Love your videos. We recently had to replace our chain when the chain pulled completely out of the fan. I do not know why we waited so long to do it, it was not as hard as we thought it would be. I see the replacement part you used has a gold chain. You may want to keep the color difference so you know which chain is which but if the bright gold color bothers you, you could use a permanent marker to darken the gold and make it not so noticeable. It is a trick I learned a long time ago when my best friend’s mother needed to hide a shiny silver screw head that showed on a coat of arms she had hung over the fireplace. Keep up the great videos.

    1. Love your tip Mary. Thanks so much for giving us the idea because the gold wasn’t my preference. I’m sure I could find a brown pull chain but the store didn’t have one.

      Although, your thought on having a different pull chain for the light does make a lot of sense. Sometimes I get confused as to which one is which, lol.

      1. Noah Laws says:

        Typically the pull chain for the light is the longer of the two chains. If the fan has a pull chain in the dead center bottom, that’s also the light chain.

        1. Thanks Noah for the tips. It’s interesting how simple this solution can be. Goes to show you can fix a lot of things by just doing some research 😉

  6. joe says:

    Any tips on what kind of CFL brand names to buy? I have CFL bulbs in areas that will burn 8 or more hours a day and 12 in the winter that are still going. I have the same type of bulbs in the washroom and I’ve replaced 4 of the six in the last 2 years. These bulbs are rated for 3 hours of use for 7 years. I’m not sure of the brand names I have, but they are all different, but the performance is different as well. OK, I know this is only testimonial. It could be the frequent on and off in the bath is hard on these bulbs. In the bath, I would be much better off with the incandescent if that is the cause of failure due to the high cost of these bulbs. I’m all for being green, but I want to save some of my own green money as well.

    1. I don’t have any recommendations Joe. Maybe someone else has a brand they like.

      It’s weird that the bulbs perform differently in the bathroom. Do you get a lot of moisture? Maybe that has something to do with it, too. But that would be weird.

      What about LED lights? Do you think they’d work?

  7. Mike says:

    What about ceiling fan installation? Or did I miss that post? 🙂
    My father-in-law has been promising to help install it for over a year now, and an install tutorial would alleviate all my worries!

    1. Haven’t done that one yet Mike. But it’s on my list. Installing fans isn’t all that bad as long as you’ve got a solid junction box attached to a joist.

      What can make it a bit confusing is the wiring. So you’ll have to let me know if your father-in-law finally helps you 😉

      1. Mike says:

        Haha, that’s the problem- I have to install one of those ceiling fan boxes between the joists. Only have a chandelier in place now, so not recommended for supporting a ceiling fan.
        I’ll let you know how it goes! Thanks for all your tutorials!

        1. Linda says:

          Hey GUYS!

          15+ years ago (current age 58) I installed the type between the joists – it’s not bad if I can do it YOU brawny guys can! And as things go, I bet they’re even easier these days!!

          1. Haha, thanks Linda for your encouragement.

            I bet a lot of people could install that type of support/junction box.

            But good job doing it yourself back in 1999 because you’re probably right that it was a bit harder back then 😀

  8. pads says:

    Hey Jeff. I am not sure how I wound up here, I was looking for the name of the “one nut holding the pull chain to the light kit housing” because it’s missing in my project, and this page popped up. I’m in the middle of fixing my fan as well. Anywho, thanks for helping (up close photos) !

  9. Mo kuwawala says:

    Hi Jeff,
    I have a hunter fan with lighting kit and remote control. There are 2 issues with the light
    1. I use CFL bulbs and they don’t last more than a month even I put incandescent bulb and they do the same, not sure what is the issue and how to fix it
    2. Remote control use to control both light and fan and from last 2 months or so it quit controlling the light but works on the fan speed just great
    Any suggestion what needs to be done
    Thanks for your help!!

    1. chance lynn says:

      for the remote part have you tried replacing batteries if not that is the problem if you have then take a picture of your fan info and take the remote back to the place with you and talk to them about it.
      for the light part go to the store you bought it from and tell them what is going on and if they cant fix it just take light back to them and tell them you want them to replace the light.

  10. jack oehler says:

    I have a harbour breeze 5 blade ,4light ceiling fan. When I turn on the light using the wall switch,the light comes on for two seconds and then goes off. I turn off the switch and then on again and the light works and stays on until I turn it off. This does not happen to the fan, only the light. Any suggestions?

  11. Pennie says:

    Our ceiling fan is turned on at the wall and the fan runs, but the light will not stay lit. It has a chain and when you pull it, it comes on but immediately goes out. Does this sound like a chain pull problem or is there something else going on here?? Thanks for any help!

  12. Abner says:

    Jeff,
    We recently installed a Harbor Breeze Saratoga ceiling fan and everything seemed to go well for about the first 10 minutes. Then the light flickered twice in about 20 seconds and went out. The fan never stopped working but the light unexpectedly quit. Two items that may or may not be of consequence: We did initially install it with 40w CFL bulbs before switching out to the ones it came with and the ceiling wiring is for 2 light switches (2 hot wires one black, one red) whereas the fan is wired for one (1 black hot wire). The fan is currently wired black/black, white/white, green/green, and the red from the ceiling is just capped off on its own. Any help that you can provide would be greatly appreciated. Thank you.

    1. Evan says:

      Did you get an answer to your question. I have the exact same fan with the same problem. My fan is only 3 weeks old; worked perfectly for one week & now the lights wont turn off with the remote.

  13. Jim says:

    Hey Jeff. I have a hunter fan with no light kit…so I bought one. Installed it by connecting the wires labeled “for light” from the fan to the appropriate wires on the kit (white to white, black/white to black. Ensured that my splices were good. Reassembled, flipped the breaker, turned the fan on, but the light kit did not work. Thinking I had a bum kit I exchanged it and had the same results. Any ideas?

    1. Doc says:

      I had the same problem of no light but a working fan. Several other online sites pointed me to this being the result of a failed wattage limiter. This is a small white chip less than an inch long with a pink and white wire connecting to it that acts like a fuse to keep people from trying to run the light fixture with too much power flowing through it. In my case, the wattage limiter said Y59 R 130C, but it’s in the same position. I had already bought a hunter light fixture with 4 of the older and wider style bulb sockets, which I didn’t return. It would allow me to use CFLs or LEDs which I couldn’t get with a bayonet. I saw another post in another thread that told me that the wattage limit to the light fixture shouldn’t total more than 190 watts. Ohm’s law for power dictates that I will be able to get the same current limitation with a 1.5 amp fuse unless I move the ceiling fan to another country running a different standard than good old USA 120 volts. 120 X 1.5 = 180. And heck, if I run the equivalent of 4 60 watt CFLs, I’ll only be using about 36 watts in the light fixture. So a 1A fuse ought to last forever. Bought an inline fuse holder and a pack of 5 1A fuses at radio shack for less that $5. I set that in line with the pink wire. It works like a charm. And the wife is happy that there is more protection on this circuit than it had when I used the fixture with incandescents.

  14. Oscar says:

    I have installed a brand new pull chain however the lights did not turn on I followed the tutorial step by step yet it stays the same. The rest of the fan works fine it Is only the lights that do not work.

  15. Nancy says:

    For me, it wasn’t the pull chain. I took the light kit off following your awesome directions, but was a little unsure at that point. I took the kit to a hardware store and they noticed some “charring” on the light bulb conduit and suggested I try using a pencil eraser to clean it off before I did any replacements ( which I would’ve had to order anyway). I did that and it worked! So pleased that with a little help from you and the hardware store I fixed it on my own. Thanks!

  16. Anne says:

    Hi Jeff,
    Thanks for this easy to follow tutorial! But my problem is the other way round. The light works fine but fan is not working. What should i do? Will changing the pull chain help to fix the fan problem? Please advice, Thank you!

  17. Mary Ann Young says:

    Different problem with fan light…one of the lights (there are three) keeps burning outlight bulbs…we keep changing them but within a day or so it burns out….do we need a new fan light fixture or an electrician….Neither my husband or myself are handy…..

    1. Noah Laws says:

      Try checking for corrosion inside the light socket itself. You can usually “erase” it with an eraser.

      1. Another good tip. If I see corrosion on copper I’ll use emery cloth to clean it off.

  18. Craig Vaughan says:

    I have a 3 speed fan and 3 light combo, Hunter ceiling fan. the pull chain for the ceiling fan quick working so I bought a new one, put it in and cannot get the fan to work. It was working before I put in the new one but the end where the chain came out was broke, so you had to pull the chain at the cover. I checked videos about what a bad capacitor looks like and mine looks fine. The only other item I can think of is the reverse switch. Before the change switch broke the fan would only work in one direction and we had to move the reverse switch to make it work. I have checked my wiring 10 times and even used a voltage tester to make sure I had the hot lead connected to the “L” on the switch. And suggestions, should I change out the capacitor and the reverse switch?? I have spent 2 days and 7 hours messing with this, Please help!

  19. Doug says:

    My problem wasn’t the chain it was the wattage limiter and now it works fine.

    1. Great job Doug figuring that out

  20. Gwynn Guiliano says:

    How do I check the wattage limiter for the lights on a Hunter ceiling fan?
    Thanks!

  21. Summer says:

    Hi, I need help getting my ceiling fan light to work. It’s a Hampton Bay model that instead of an on/off switch has a fancy push button panel. I thought the lights weren’t working because the bulbs were burned out. Replacing all 3 bulbs did nothing, so now I’m thinking it’s the button that controls the light. The buttons that control fan speed work fine and a little red light turns on when you press them. No red light turns on when you press the button for the light. I would appreciate any help.

  22. Ramon Preston says:

    Figuring out that he limiter is bad was a lot easier than finding one. Where can I buy a Y59 R 130C limiter?

    1. Jodi Goike says:

      Ramon,
      I have a Hampton Bay ceiling fan and had problem with lights coming on momentarily and then going out. I could not get them to stay on at all. Had home warranty then and their tech showed me the part (wattage limiter) but said it was not a generic part and I would have to replace the whole fan, but would not be covered by my home warranty, which only covers fans, but not failed light kits or light kit parts! Anyway, I googled the part number and was able to order it only. It’s been several months ago, so I don’t recall exactly, but I think it might have been special ordered via Home Depot (not stock in their stores) and I believe it only cost me about $6-8.00.
      Unfortunately, now the pull chain switch is out and that’s why I’m on this site. My house is only 5 years old, so it seems odd that I’m having such problems with this fan! I don’t recommend Hampton Bay fans!!!

  23. Dan says:

    I turned in my light and the bulb blew. It shut the other bulbs off but not blown. Checked the breaker and it was good. Replaced the blown bulb and still no lights. Fan works.

  24. Kevin says:

    I have a harbor breeze 5 blade ceiling fan that the lights don’t work on. The fan works and all the bulbs are good. Not sure what to look for.

    1. chance lynn says:

      i suggest you changing the light kit with another fan light kit in your house.

  25. Sheila Reed says:

    Hi, we have a Hunter Adirondack 52-in. Brittany Bronze ceiling fan. Model # 20715. The lights quit working after an odor of burning/melting plastic. The fan still works. The pull chain has been replaced. Didn’t help. We can not get a new light kit as they no longer make them for this model. Do you know which little black box operates the lights? Hope you can help, love this fan and the serenity speed. Would hate to spend 200.00 to replace it.

    1. chance lynn says:

      i suggest you replaccing the light kit with another one in one of your other fans. if this works then just letting you know my older brother Brad told my dad this idea and it worked with our fans.

  26. Jawed Sidd says:

    HI JEFF ,thanks for all the tips you give us to learn more and mor.Please tell me,My ceiling fan on of the bulb flicker and rest of the three buls stay good. What causing only one light bulb in ceiling fan flicker? and how can I fix this issue. Right now I loosen that bulb ,since rest of the three bulbs are working. Any suggestion??

    1. Thanks Jawed for your question. It could be a faulty bulb, that’s the first thing I’d change. It could be a bad contact inside the fan. Hard to say without seeing it though.

  27. Lou Owens says:

    Hi Jeff,
    I just looked up at my ceiling fan and realized the light fixture was just hanging from a wire coming from the center of the fan. Can you tell me how to fix it?

    1. Stephanie says:

      Hi Jeff! I’m having the same problem as Lou above….I cleaned my ceiling fan and as soon as I stepped down- the light kit detached from the fan and it is now dangling by the wires. Can you tell me how to attach the kit back to the fan? Can I send you a picture of the ceiling fan?

  28. Will Kneerim says:

    Hi, My ceiling fan is a 25 year old Casablanca model that’s hard wired (no pulls). The fan works, but the lights don’t. I’ve seen your video about replacing the light kit (for a different kind of fan), but I’m wondering if that’s the best thing to try first? Could the problem be in the wall switch? Any advice? Thanks, Will

  29. Bob Eliason says:

    Jeff: Thanks for your very helpful posting regarding changing the light switch. Worked like a charm for the promised $4.
    Bob

    1. Fantastic! Happy it helped. Great job fixing it.

  30. Deaun says:

    Good morning Jeff,

    I have a fan light issue that the $4 fix me get not work for. Mostly I need an opinion from an idea guy!
    The scene: one bulb burned out. My husband tried to unscrew it and ended up twisting the bulb from its base. Having only turned the lights off and not turning the power off at the panel, my husband shorted across the the bulbs base/screw in and POP, the other lights went out without blowing the bulbs. My question: what do I do now, because I don’t want him breaking anything else.

    Thank you for any help,
    Deaun

    1. Deaun, thanks for your question. Are you asking what to do if the base of the bulb remains in the light?

  31. Fred Woody says:

    Jeff,
    Call me Mr. Skeptic. My ceiling fan light quit working for no apparent reason, so I reluctantly tried your idea of simply changing the pull switch. Unbelievable! It worked like a charm. Still can’t believe it! And for $5! Thanks for your suggestion – you saved me at least $100.
    Fred

    1. Nice, great job Fred!! Always worth trying the cheap fix first.

  32. Mike says:

    I replaced the Pull chain for the light but the light stays on still the only way to turn it off is by the wall switch so the only time i can run the fun is with the light on and ideas

  33. Chad brown says:

    Got a 62″ turn of the century ceiling fan we just hooked it up the light works but fan is not work..has a remote but no chains on fan

  34. lewanna says:

    Help. Ceiling fan worked fine. We put in a drop ceiling. Took off the fan blades so we could work. Cut tile to fit around outer housing with 1/4+ inch space. Now the only way the fan works is with the housing off the unit. When we put the housing on and twist to lock the fan runs slow. I can’t see any place that it is touching and it also has a hum that was not there before.. Any idea’s?

  35. jessica says:

    Hello Jeff,
    My ceiling fan unable to work this summer but it was fine at the end of last summer. I tried to change the battery in remote control still not working. What could be the reason? Thanks a lot.

  36. Barbi says:

    Hi Jeff: my husband changed a lightbulb in our ceiling fan. The bulb worked at first, then it, and the other 3 bulbs went out. We removed the bulb and turned it back on and the 3 left worked. Shut the light off, put in the new bulb again, they all work for a few seconds, then all go out again. We tried a different bulb, same thing. Never had a issue with this fan before. Light works with the 3 remaining bulbs. Your thoughts…?

  37. Christi says:

    Hi Jeff, I noted your ceiling fan has 8 wires.,we’re having problems rewiring a Hampton Bay E75795 1996 Ceiling Fan which I understand is the same as the Hunter brand one just a different name. Anyway I’ve spent hours hunting the Web looking for a Wiring Schematic for one to no avail, I’m probably not wording it correctly or something.. So I was hoping You might happen to know where I can find a copy of the Electrical Schematic diagram for the 8 wired fan , I think from what I’ve discovered so far is that 4 wires go to the capacitor and 4 to the switch/es . Thank You so much for your help.
    Christi

Leave a Reply

Your email address will not be published. Required fields are marked *